Your Ultimate Guide to Making a Twin Size Quilt
A twin quilt is one of the most versatile projects you can tackle. It’s the perfect size for a child's first "big kid" bed, a cozy addition to a guest room, or a staple for any university dorm room. But before you start cutting fabric, there's one crucial detail every quilter needs to know: the difference between a standard twin and a Twin XL.
Your Guide to the Twin Size Quilt

More than just a warm covering, a twin quilt is a fantastic milestone project. It’s substantial enough to feel like a huge accomplishment but not so massive that it becomes overwhelming, especially if you're quilting it on your home sewing machine. This makes it a go-to for quilters levelling up their skills and a satisfyingly quick project for seasoned pros.
Here in Canada, twin quilts are a practical and popular choice. They’re a natural fit for the smaller living spaces in many Ontario apartments and condos. Canadian quilters are a dedicated bunch, and we love to support our local shops. In fact, a recent survey found that 61% of quilters buy their fabric from local stores, often looking for quality quilting cottons sold by the half metre, just like we offer at All About Sewing. You can dive deeper into these quilting market trends and see where our crafting community is headed.
Understanding Standard Twin vs Twin XL
The first hurdle for many quilters is figuring out the difference between a standard twin and a Twin XL. It’s a simple distinction, but getting it right is the key to a quilt that fits perfectly.
- Standard Twin: This is your classic twin bed, with a mattress measuring 38 inches wide by 75 inches long. Your quilt needs to be wider and longer than this to hang nicely over the edges.
- Twin XL (Extra Long): Often found in university dorms, this mattress is also 38 inches wide but stretches to 80 inches long. That extra five inches makes all the difference.
The biggest mistake you can make is forgetting about that extra length for a Twin XL. An otherwise beautiful quilt can end up looking comically short, leaving someone's toes out in the cold!
Let's break down the sizes side-by-side to make it even clearer.
Twin vs Twin XL Quilt Dimensions at a Glance
This quick comparison chart highlights the key measurements for both the mattress and the ideal finished quilt size, helping you plan your project with confidence.
| Dimension | Standard Twin | Twin XL |
|---|---|---|
| Mattress Size | 38" x 75" | 38" x 80" |
| Typical Quilt Size | 70" x 90" | 70" x 95" |
As you can see, the only difference is the length. A good rule of thumb is to add about five inches to the length of a standard twin quilt pattern to make it fit a Twin XL.
Why This Size Is a Great Starting Point
Making a twin size quilt is a fantastic way to build your skills. It’s a manageable project where you can master the fundamentals—from accurate cutting and piecing to applying a perfect binding—without the fabric and time commitment of a queen or king size quilt. It’s the perfect step up from a baby quilt or table runner.
This size also gives your creativity plenty of room to breathe. Whether you're dreaming of a simple patchwork design or intricate star blocks, the quilt top is large enough to create a stunning visual impact. As you work through this guide, you’ll find everything you need to choose your pattern, calculate your fabric, and bring your own beautiful twin quilt to life.
Figuring Out Your Fabric Needs
Walking into a fabric shop without a clear shopping list can be a bit like grocery shopping when you’re hungry—everything looks good, and you're bound to forget something important. Let's take the guesswork out of the equation and turn your twin quilt idea into a concrete plan.
Think of it this way: every quilt is made of three key parts. You’ll need to figure out the fabric for each one separately to make sure you have enough to see your project through from the first cut to the final stitch.
- The Quilt Top: This is the star of the show—the colourful, pieced front. How much fabric you need here is completely tied to the pattern you've chosen.
- The Backing: This is the single, large piece of fabric on the back. It needs to be bigger than your quilt top to give you room to work during the quilting stage.
- The Binding: These are the long fabric strips that neatly finish the edges, giving your quilt a durable and professional-looking frame.
Don't Forget the Little Details
Getting your fabric numbers right isn't just about the final size of the quilt. A few other things come into play, and forgetting them is a classic mistake that can leave you scrambling for more fabric halfway through.
First, there's the quarter-inch seam allowance. It might not sound like much, but it really adds up over dozens of little pieces. You also have to think about shrinkage. Most quilting cottons shrink by about 3-5% in the wash, so buying a little extra and pre-washing is always a good idea.
And finally, keep an eye out for directional prints. If your fabric has a pattern that only goes one way, you’ll need more fabric to make sure all your pieces are facing the right direction. It's a small detail that makes a huge difference.
Fabric and Batting Yardage Chart for Twin Quilts
To make your life easier, I've put together this handy chart. It gives you a solid estimate of what you'll need for both standard twin and Twin XL quilts. These numbers are a great starting point for a simple patchwork design, but remember to adjust them if your pattern is more intricate.
| Quilt Component | Standard Twin (Approx. 63" x 87") | Twin XL (Approx. 63" x 92") | Notes |
|---|---|---|---|
| Quilt Top | ~4.5 - 5.5 metres total | ~5 - 6 metres total | Varies a lot based on your pattern's complexity. |
| Backing | ~4.2 metres (Standard Width Fabric) | ~4.5 metres (Standard Width Fabric) | Based on 112cm wide fabric that will be pieced together. |
| Batting | 183cm x 244cm (Packaged Twin Size) | 183cm x 244cm (Packaged Twin Size) | Always buy batting at least 10cm larger on all sides. |
| Binding | ~0.6 metres | ~0.7 metres | Calculated for standard 2.5-inch wide strips. |
Think of this chart as your friendly guide. If you have a pattern, it's your ultimate source of truth. But if you're designing something yourself or just need a quick reference, this is a reliable place to start.
Let's Walk Through an Example
So, how does this work in the real world? Let's say you're making a standard twin quilt, and your fabric is the typical 112cm (44 inches) wide. Your quilt top is about 160cm wide.
Since your fabric isn't wide enough, you'll need to piece the backing. The easiest way is to sew two long pieces together. Buying 4.2 metres gives you enough to cut two pieces, each 2.1 metres long. When you sew them together, you'll have a backing panel that's more than wide and long enough for your quilt top, with plenty of wiggle room for quilting. A little bit of simple math up front can save you a frustrating trip back to the store later.
Finding the Perfect Pattern for Your Quilt
Alright, let's get to the fun part: picking a design for your quilt. Think of a quilt pattern like a favourite recipe—it gives you a great foundation, but you're always free to add your own personal touch. There are so many patterns out there that work beautifully for a twin size quilt, so let's explore a few.
The trick is to find that sweet spot between your skill level and the look you're going for. A twin quilt is the perfect canvas because it’s big enough for detailed designs yet still manageable if you prefer something bold and simple.
Great Patterns for Beginners
If you're just starting out, you'll want a pattern that helps you learn the ropes without getting you tangled up in frustration. The goal here is a beautiful finish that makes you feel proud and ready for the next project. Sometimes, the simplest designs are the most stunning.
Here are a couple of fantastic starting points:
- Classic Patchwork: This is the quilt design everyone pictures, made from simple fabric squares. It’s the absolute best way to master that perfect quarter-inch seam and have a blast playing with different fabric combinations.
- Rail Fence: This pattern uses fabric strips sewn together into blocks. When you arrange them, you get this amazing zig-zag effect. It’s one of the fastest and most satisfying quilts you can make.
The real magic of these beginner patterns is how versatile they are. A simple patchwork can feel traditional and cozy made with rustic flannels, or it can look sharp and modern using bright, solid colours. It’s all in the fabric.
This visual helps break down the main parts you'll be working with.
 Seeing the quilt top, backing, and binding as separate pieces helps you understand how the pattern you choose for the top will affect the fabric you'll need for everything else.
Patterns for the Adventurous Quilter
Feeling good about the basics? Maybe it’s time to try a pattern with a few more moving parts. These designs introduce new skills, like making half-square triangles (HSTs) or assembling more complex blocks, but they’re still completely doable for a twin size project.
Why not give one of these rewarding patterns a try?
- Log Cabin: A true classic. This pattern is built around a centre square (the "hearth"), with fabric "logs" added around it. It’s a brilliant way to use up scraps and creates a gorgeous sense of depth.
- Star Blocks: From the simple Sawtooth Star to the more intricate Ohio Star, these designs are quilting icons. They look complicated but are usually just a clever combination of squares and HSTs, making them a great next step.
- Fat Quarter Stars: This is a fresh, modern take on the star block that's very beginner-friendly. Patterns like this are designed to work perfectly with fat quarters—those handy pre-cut fabric pieces measuring about 45cm x 53cm—which takes all the guesswork out of choosing your fabrics.
Your quilt top is a canvas, so don't be afraid to play around. The same pattern can look completely different just by switching up your fabric placement. A dark background will make your colours pop, while a light one can give the whole quilt a softer, airier feel.
Scaling and Modifying Patterns
So what happens if you fall in love with a pattern, but it's designed for a baby quilt? No problem at all. Most quilt patterns are incredibly easy to scale up or down. Since quilts are just repeating blocks, you can simply change the number of blocks to get the twin size you need.
To scale a pattern, you’ll generally:
- Figure out the finished size of a single block.
- Calculate how many blocks you need in rows and columns to reach your target size (around 160cm x 220cm for a twin).
- Add sashing (fabric strips between blocks) or a border to hit the exact dimensions.
This flexibility is one of the best things about quilting. It gives you the freedom to make any design your own, ensuring your finished twin size quilt is a perfect fit for its new home and a true reflection of your style.
Bringing Your Quilt Top to Life
This is where all the planning and cutting pays off—the moment your stacks of fabric start to become a real quilt top. It’s a bit like putting together a puzzle, where careful work and a little patience bring the whole picture into focus. The final result will be a beautiful, professional-looking quilt you can be truly proud of.
The path from individual pieces to a finished quilt top is a straightforward one. We’ll cover the basics of piecing your blocks, then move on to building the "quilt sandwich," and finally, add the binding that frames your work. Each step builds right on the last, leading to a twin size quilt that’s both sturdy and stunning.
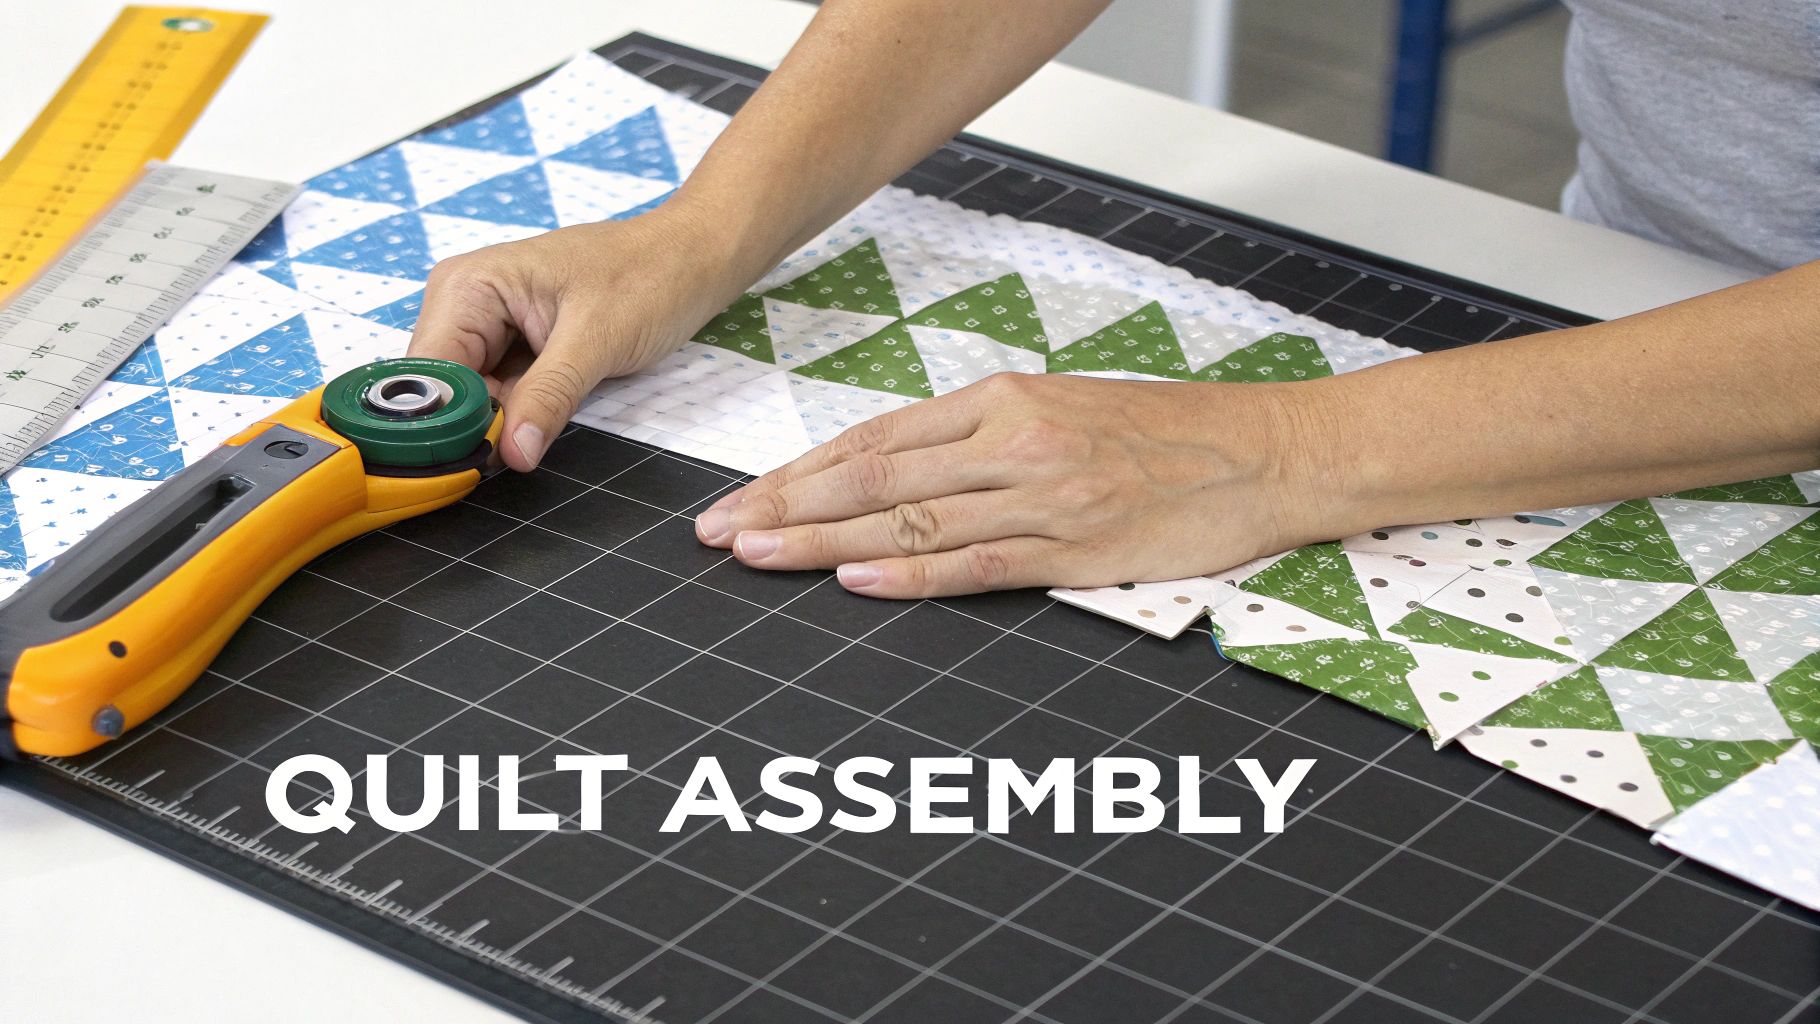
Mastering the Art of Piecing
The secret to a quilt top that lays perfectly flat isn't complicated. It all comes down to three key habits: cutting accurately, sewing consistent seams, and pressing properly. Nail these fundamentals from the get-go, and you'll sidestep a lot of frustration later on.
- Precise Cutting: Your rotary cutter and mat are your most important tools here. A sharp blade and a good quilting ruler are non-negotiable for making sure every single piece matches your pattern’s dimensions exactly.
- The Perfect Seam: In the quilting world, the quarter-inch seam is everything. Most modern sewing machines come with a special presser foot just for this job, making it so much easier to get that consistent seam allowance every time.
- Strategic Pressing: Fight the urge to iron your seams back and forth like you would a shirt—that can easily stretch your fabric out of shape. Instead, press your seams by lifting and placing the iron. Pressing seams open is great for reducing bulk, but pressing them to one side (usually towards the darker fabric) often makes joining blocks a bit quicker.
Once your blocks are all pieced, lay them out to match your design. You'll sew them into rows first, and then join those rows to complete the quilt top. Don't be afraid to use lots of pins, take your time, and really enjoy watching it all come together.
Building the Quilt Sandwich
With the quilt top done, it's time to assemble the three layers that officially make it a quilt: your backing fabric, the fluffy batting in the middle, and your beautiful top. We call this the "quilt sandwich," and putting it together properly is crucial for avoiding puckers while you're quilting.
Think of basting as temporary glue for your quilt sandwich. Its only job is to keep all three layers from shifting while you add the permanent quilting stitches. A quilt that's basted well is so much more enjoyable to work on.
To get started, find a large, clean floor space and lay your backing fabric down, wrong side facing up. Smooth it out completely and use painter's tape to secure the edges and keep it taut. Next, centre the batting on top, smoothing out any wrinkles. Finally, lay your quilt top, right side up, over the batting.
You have three main options for basting your quilt:
- Pin Basting: Use curved safety pins made specifically for quilting. You’ll want to place a pin every 4 to 6 inches across the entire quilt.
- Spray Basting: This is a fast method using a temporary spray adhesive to hold the layers. Just be sure to work in a well-ventilated area.
- Thread Basting: Take a needle and thread and make long, running stitches by hand across the quilt to hold the layers in place.
It's no surprise that handmade twin size quilts are becoming more popular. They fit right in with Canada's growing utility bedding market, which was valued at USD 2,083 million in 2023 and is expected to climb to USD 3,445 million by 2032. Here in Barrie, Ontario, quilters of all levels turn to local experts like All About Sewing—which handles a huge 30-48% of local notions and fabric sales—for the supplies they need. By using quality machines from brands like JUKI or PFAFF and taking classes, anyone can create a personalized quilt that brings warmth and character to a home. You can dig into more of these numbers in the Canada utility bedding market report.
Finishing with a Flawless Binding
The binding is the final frame for your artwork. It’s a clean, durable finish that encases the raw edges of your quilt. You’ll make it from long strips of fabric, typically cut 2.5 inches wide.
First, you'll sew these strips together end-to-end to create one long piece that can go all the way around your quilt. Fold this strip in half lengthwise and press it flat. Then, you’ll sew the raw edge of the binding to the front of your quilt, creating neat, mitered corners as you go. To finish, just wrap the folded edge around to the back and stitch it down—either by hand for an invisible finish or by machine for speed.
Choosing the Right Machine for Your Quilting Journey
Your sewing machine is your partner in crime when you're making a quilt. And while pretty much any machine can handle a straight line, some features can make the difference between a frustrating chore and a genuine joy, especially when you're tackling a twin size quilt.
Think of it like trying to cook a huge pot of soup for a family dinner. You could do it with a tiny saucepan, but a big stockpot makes the whole process so much easier. The same idea applies here—you need the right tool for the job.
Why Throat Space Matters So Much
If there’s one thing that will change your quilting life, it’s throat space. This is simply the distance between the needle and the main body of the machine. Your average sewing machine probably has about 5.5 to 7 inches of space, which is totally fine for piecing together quilt blocks.
But when it comes time to quilt, you have to wrangle that entire rolled-up quilt sandwich through that little gap. It can feel like you’re wrestling an octopus. A machine with a wider throat space—9 inches or more—gives you the breathing room you need to move the quilt around without a struggle. It saves your shoulders and leads to much smoother, more even quilting.
Having ample throat space isn't just about comfort; it's about control. More room means you can see your work more clearly and guide the fabric with greater precision, which is key to achieving beautiful, even quilting stitches.
Must-Have Features for Quilters
Beyond the sheer size of the machine, a few features and accessories are absolute game-changers for quilters. These tools are specifically designed to deal with the challenge of sewing through three layers (top, batting, and backing) without things shifting and puckering.
A great machine for quilting should have:
- A Walking Foot: This is non-negotiable. This special foot has its own set of feed dogs on top that work with the machine's feed dogs below. It grabs all the layers and "walks" them through together, preventing the top layer from creeping ahead. It's your best friend in the fight against puckers.
- Speed Control: This is usually a little slider on the front of the machine. It lets you set a maximum speed, so even if you floor the foot pedal, the machine will chug along at a steady, controlled pace. It’s a lifesaver for free-motion quilting, letting you focus on your hands' movements, not your foot's.
- Needle Up/Down Function: This handy button lets you choose whether the needle stops in the fabric or out of it. Setting it to stop in the "down" position acts like a third hand, pinning your quilt in place every time you stop to pivot or adjust your grip.
Finding the Right Machine for You
Picking a machine is a big decision, and it really comes down to your budget, how much space you have, and what your quilting goals are. Here at All About Sewing, we help people find their perfect match every single day, whether they're just starting out or looking for a professional setup.
Here's a quick look at the different tiers:
- For the Beginner: You can absolutely get started with a solid entry-level machine from a brand like Brother or Singer. Just make sure it’s a sturdy model and that you can get a walking foot for it.
- For the Hobbyist: If you've been bitten by the quilting bug, you might want to look at brands like PFAFF or JUKI. They make fantastic workhorse machines with larger throat spaces and features designed with quilters in mind.
- For the Professional: For the ultimate quilting setup, a dedicated long-arm quilting system is the dream. Brands like Handi Quilter put the machine on a large frame, so you move the machine head over the quilt instead of pushing the quilt under the needle.
Caring for Your Handcrafted Quilt
You’ve poured so much of yourself into this twin size quilt—every stitch, every seam. Now comes the final, crucial step: making sure it lasts a lifetime. With the right care, your creation can become a true family heirloom, and keeping its colours bright and its feel soft is easier than you think.
That first wash is always a bit nerve-wracking, isn't it? Before you toss it in, I highly recommend using a colour catcher sheet. It’s a simple trick that can save you from the heartache of bleeding dyes, especially if you've used any bold reds or deep blues.
Washing Your Quilt Safely
When your quilt needs a refresh, treat it like the work of art it is. Think of it less as another load of laundry and more as a gentle spa day for your cozy masterpiece.
Here's my go-to method for machine washing:
- Go Gentle: Always choose a delicate or gentle cycle with cold water.
- Pick the Right Soap: A mild, pH-neutral detergent made for quilts or delicates is your best friend. Steer clear of harsh chemicals or fabric softeners, as they can break down the cotton fibres over time.
- Dry with Patience: The best way to dry a quilt is to lay it flat or hang it on a line out of direct, harsh sunlight, which can fade the fabric. If you must use a dryer, tumble dry on the absolute lowest heat setting.
Every wash will soften the fibres just a little more, adding to that lovely, crinkly quilt character. Washing only when truly needed—maybe two to three times a year for a well-loved quilt—is the secret to making it last for decades.
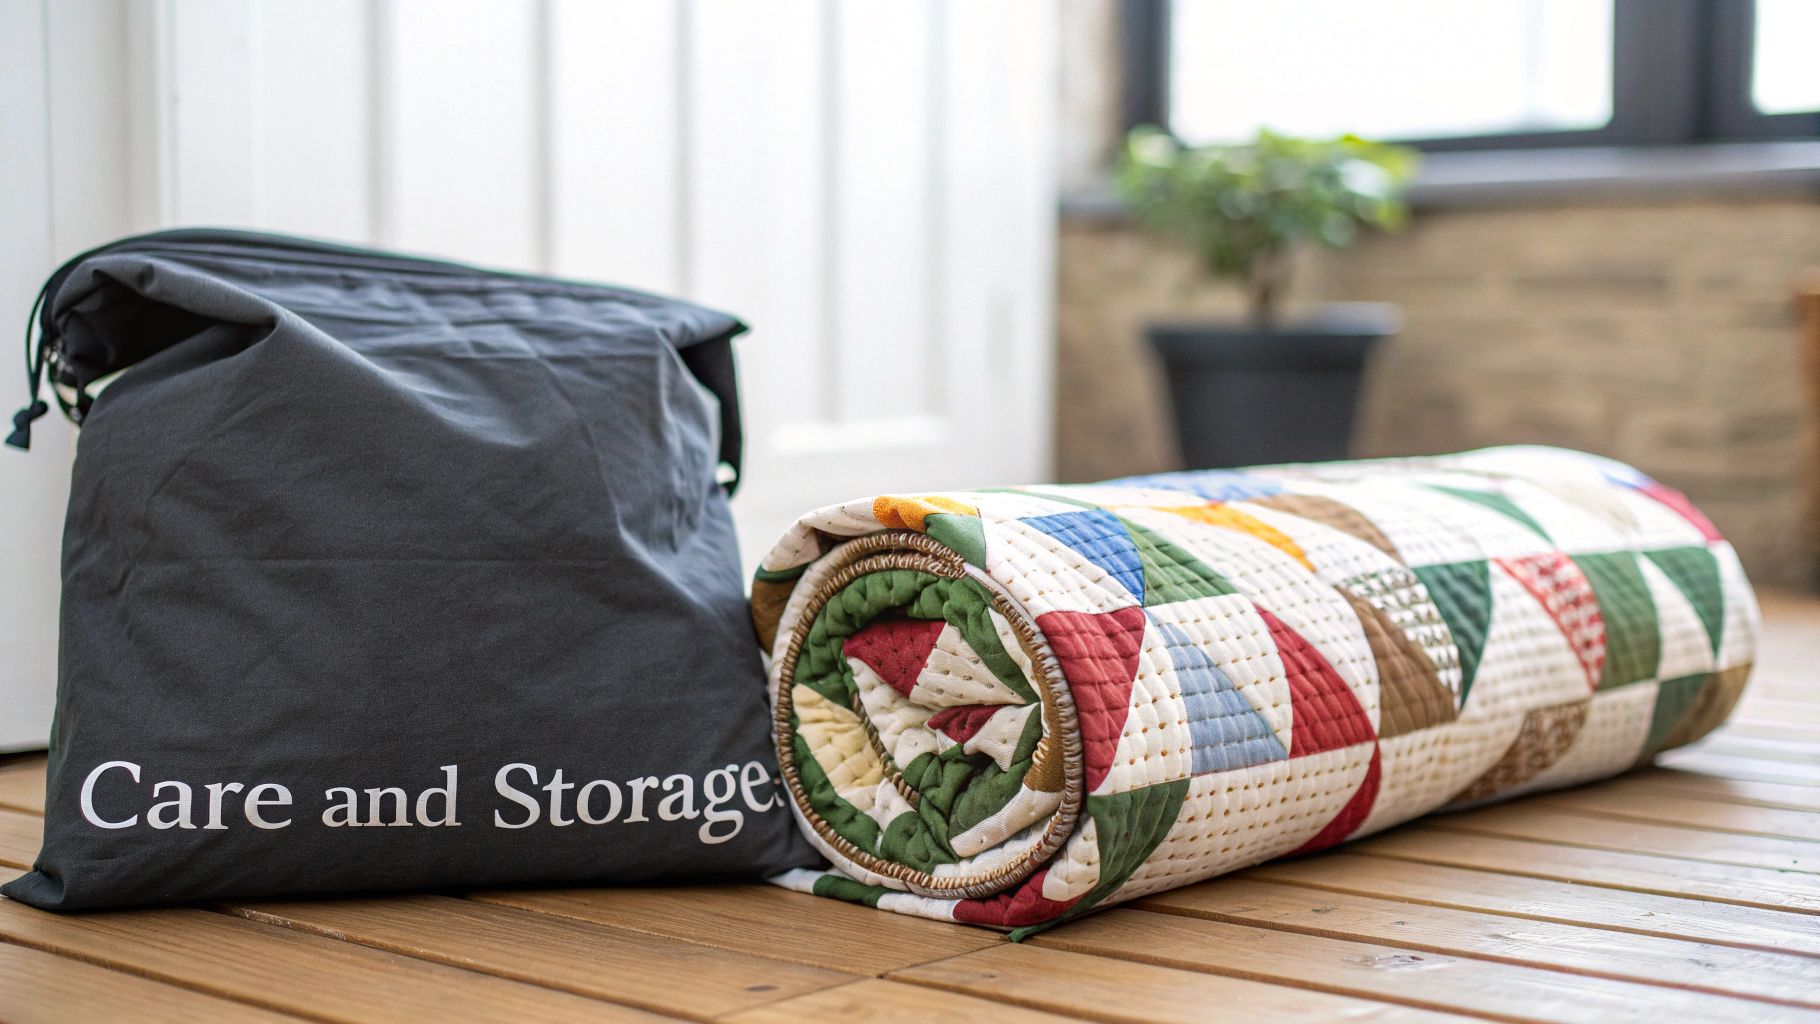
Storing Your Quilt Properly
How you put your quilt away is just as critical as how you wash it. Bad storage habits can lead to stubborn creases, discolouration, or even damage from pests. The key is to protect your quilt while still letting the fabric breathe.
For anything more than short-term storage, rolling your quilt is always better than folding. Folding creates sharp creases that put stress on the fibres and batting, causing them to weaken over the years. A great trick is to roll it around a cardboard tube that you've covered in acid-free paper.
Once it's rolled, slip it into a breathable cotton or muslin bag. Please, never use plastic! Plastic traps moisture, which is an open invitation for mildew. Find a cool, dark, and dry spot for it—a shelf in a closet or tucked under a bed is perfect.
Your Twin Size Quilt Questions Answered
Even the most seasoned quilters run into questions mid-project. Let's tackle some of the common ones that come up when you’re putting together a twin size quilt, so you can keep quilting with confidence.
How Much Overhang Should a Twin Quilt Have?
This really comes down to the look you're going for and how thick your mattress is. A good rule of thumb is to aim for 10 to 15 inches of drape on the three sides that hang off the bed—the left, right, and foot.
For a standard 38-inch wide twin mattress, a quilt that finishes at 63 inches wide will give you a lovely 12.5-inch overhang on both sides. But don't forget to measure your mattress first, especially if you use a plush topper! This simple step ensures your finished twin size quilt hangs just right.
Can I Use Fabrics Other Than 100 Percent Cotton?
Absolutely! While quilting cotton is the classic choice for a reason—it’s stable and a dream to work with—don't be afraid to experiment. A cozy flannel backing can make a quilt extra snuggly, and a linen blend can add a gorgeous, sophisticated texture to the top.
Just keep one thing in mind: different fabrics can shrink differently. The best way to prevent your quilt from puckering after its first wash is to pre-wash all your fabrics before you even think about cutting, particularly when you're mixing materials.
Piecing a backing is a fantastic opportunity to add a "secret" design element to your quilt. A strip of leftover blocks from the quilt top can turn the back into a surprise second masterpiece.
How Do I Back a Quilt if My Fabric Is Too Narrow?
This is a classic quilting problem. Standard quilting fabric comes in at about 42-44 inches wide, which just won't cut it for a twin quilt back. The simplest fix is to piece the backing by sewing two lengths of your chosen fabric together vertically.
If you'd rather skip the seam, look for extra-wide backing fabric. It typically comes in widths of 108 inches, giving you more than enough room to work with and saving you a bit of time.
Here in Ontario, we're seeing more and more quilters creating beautiful twin size quilts, perfectly timed with Canada’s growing home furnishings market. In fact, furniture wholesaling has become a $5.2 billion industry. Quilts are a huge part of this trend, leading the way in bed linen sales. While online shopping is popular, many makers still prefer visiting local shops like All About Sewing for that hands-on advice and community connection that makes Barrie’s creative scene so special. You can dig into the numbers in this Canadian wholesale furniture industry report.
At All About Sewing, we have everything you need to bring your next quilting project to life, from the perfect fabric to the ideal machine. Explore our collection of quilting supplies and get started today!


