How to Install a Zipper a Guide for Flawless Results
Before you even think about stitching, let's talk about setting yourself up for success. Getting a clean, professional-looking zipper isn't just about technique; it starts with having the right tools on hand. Your sewing machine, a proper zipper foot, sharp scissors, and good thread are the absolute basics.
Your Essential Toolkit for Perfect Zipper Installation
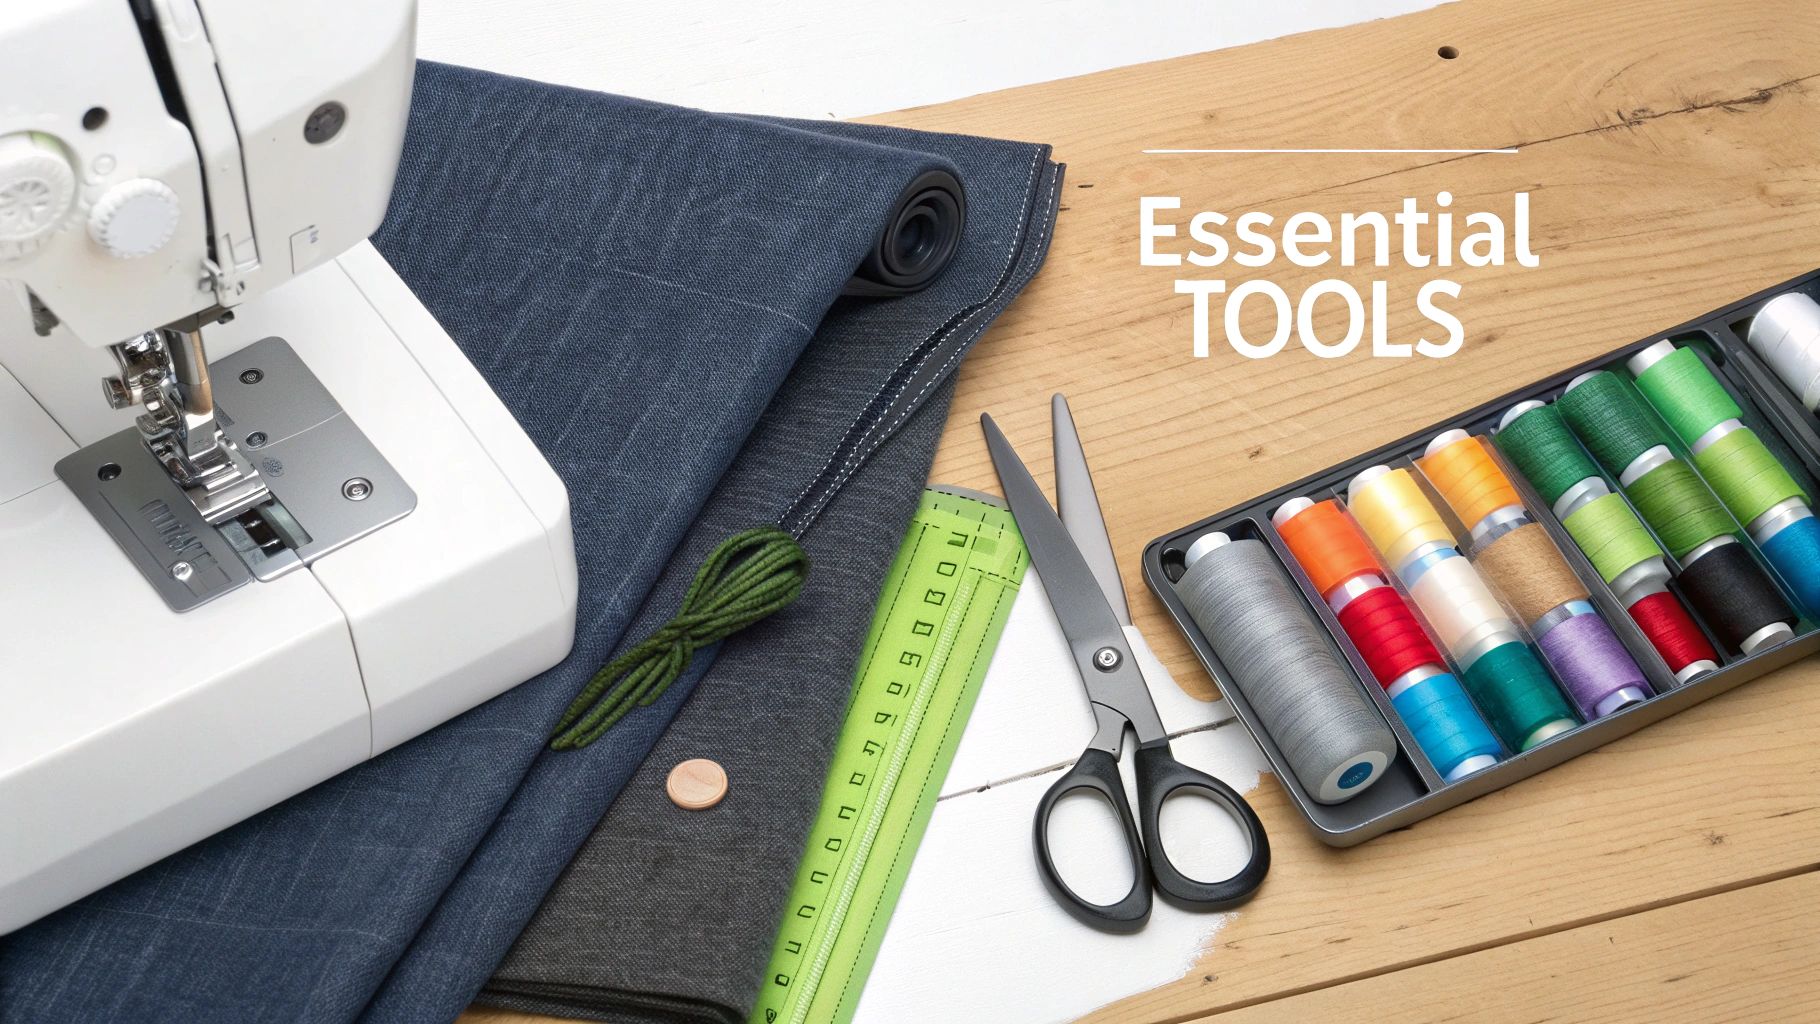
Preparing your workspace with the right supplies is non-negotiable. Honestly, it’s what separates a frustrating afternoon of puckered seams from a smooth process that ends with a beautiful finish. I always think of it like cooking: a great chef needs sharp knives, and a sewist needs precise tools for a task like this.
The single most important tool, besides your machine, is the correct presser foot. You simply can't get those neat, straight stitches right up against the zipper teeth without one.
Must-Have Presser Feet
Picking the right presser foot for the job makes a world of difference. It's not about having dozens of feet, but having the right one for the zipper you're installing.
| Zipper Type | Recommended Presser Foot | Why It's a Game-Changer |
|---|---|---|
| Centered or Lapped | Standard Zipper Foot | Its narrow design and notches on both sides let you get the needle incredibly close to the zipper teeth for a clean stitch line. |
| Invisible | Invisible Zipper Foot | Grooves on the underside guide the zipper coils perfectly, allowing you to stitch right in the ditch for a truly hidden finish. |
| Separating (Jackets) | Standard Zipper or Edge-Stitching Foot | Gives you the control needed for precise topstitching on bulkier projects like coats and bags. |
This small investment in the right foot pays off instantly in the quality of your work.
Core Sewing Supplies
Beyond the specialized feet, a few other things should always be within arm's reach.
- Sharp Fabric Scissors: You need clean cuts for your fabric and threads, no chewing or fraying.
- Seam Ripper: Let's be real, mistakes happen! A good seam ripper is your best friend for undoing stitches without wrecking your fabric.
- Marking Tools: A fabric pen or chalk is essential for marking your zipper placement and stop points with accuracy.
- Pins or Wonder Clips: These hold the zipper tape steady so it doesn't wiggle around while you're trying to sew a straight line.
If there's one piece of advice I can give, it's this: investing in quality thread and the right presser feet will solve most common zipper headaches. Puckering and wonky seams can almost always be traced back to using the wrong tools.
Having a reliable sewing machine is also a huge factor. It's a tough stat, but hobbyists often face a 25% failure rate on their first few zipper attempts without the proper equipment. The Canadian sewing machine market, valued at USD 41.0 million in 2024, is growing for a reason—sewists are realizing how much quality tools matter.
Electric models are fantastic for the precise control needed for zipper topstitching. Here at All About Sewing, we carry machines from BERNINA and PFAFF that are brilliant for just this kind of detailed work. You can learn more about sewing machine market trends in Canada to see how the industry is evolving.
Installing the Classic Centred Zipper
The centred zipper is usually the first one we all learn, and for good reason. It’s a workhorse application you’ll see everywhere—skirts, trousers, cushion covers, you name it. Once you get this technique down, you’ll have a solid foundation for just about any zipper installation you'll encounter.
This method gives you a perfectly symmetrical look, with that classic rectangular stitch pattern visible on the outside. It’s a clean, timeless finish that's both practical and part of the design. Let's walk through it, focusing on those little details that really elevate the final result.
Getting Your Seam and Zipper Ready
A perfect zipper installation actually starts long before you get to your machine. First things first, you need to finish the raw edges of your seam allowances. A quick run through a serger, a simple zigzag stitch, or even a pass with pinking shears will do the trick and stop any fraying down the line.
Now, place your fabric pieces right sides together and get ready to sew the seam that will hold the zipper. This is a two-part process using different stitch lengths:
- Basting Stitch: Start at the top raw edge and sew down to the point where your zipper will end. Use a long basting stitch (I find 4.0-5.0 mm works well). Critically, do not backstitch at the beginning or end of this basting.
- Regular Stitch: Right where the basting stops, switch back to a standard stitch length (around 2.5 mm). Backstitch here to secure it, and then finish sewing the rest of the seam as usual.
Pressing this seam open is probably the most important part of the whole prep stage. Seriously. A flat, crisp seam is your best guide for getting the zipper placed just right.
Pro Tip: Once your seam is pressed open, lay the zipper face down, making sure it’s centred perfectly over the seam line. I swear by wash-away wonder tape to hold it in place. It’s so much better than pins, which can cause little puckers and shift the fabric.
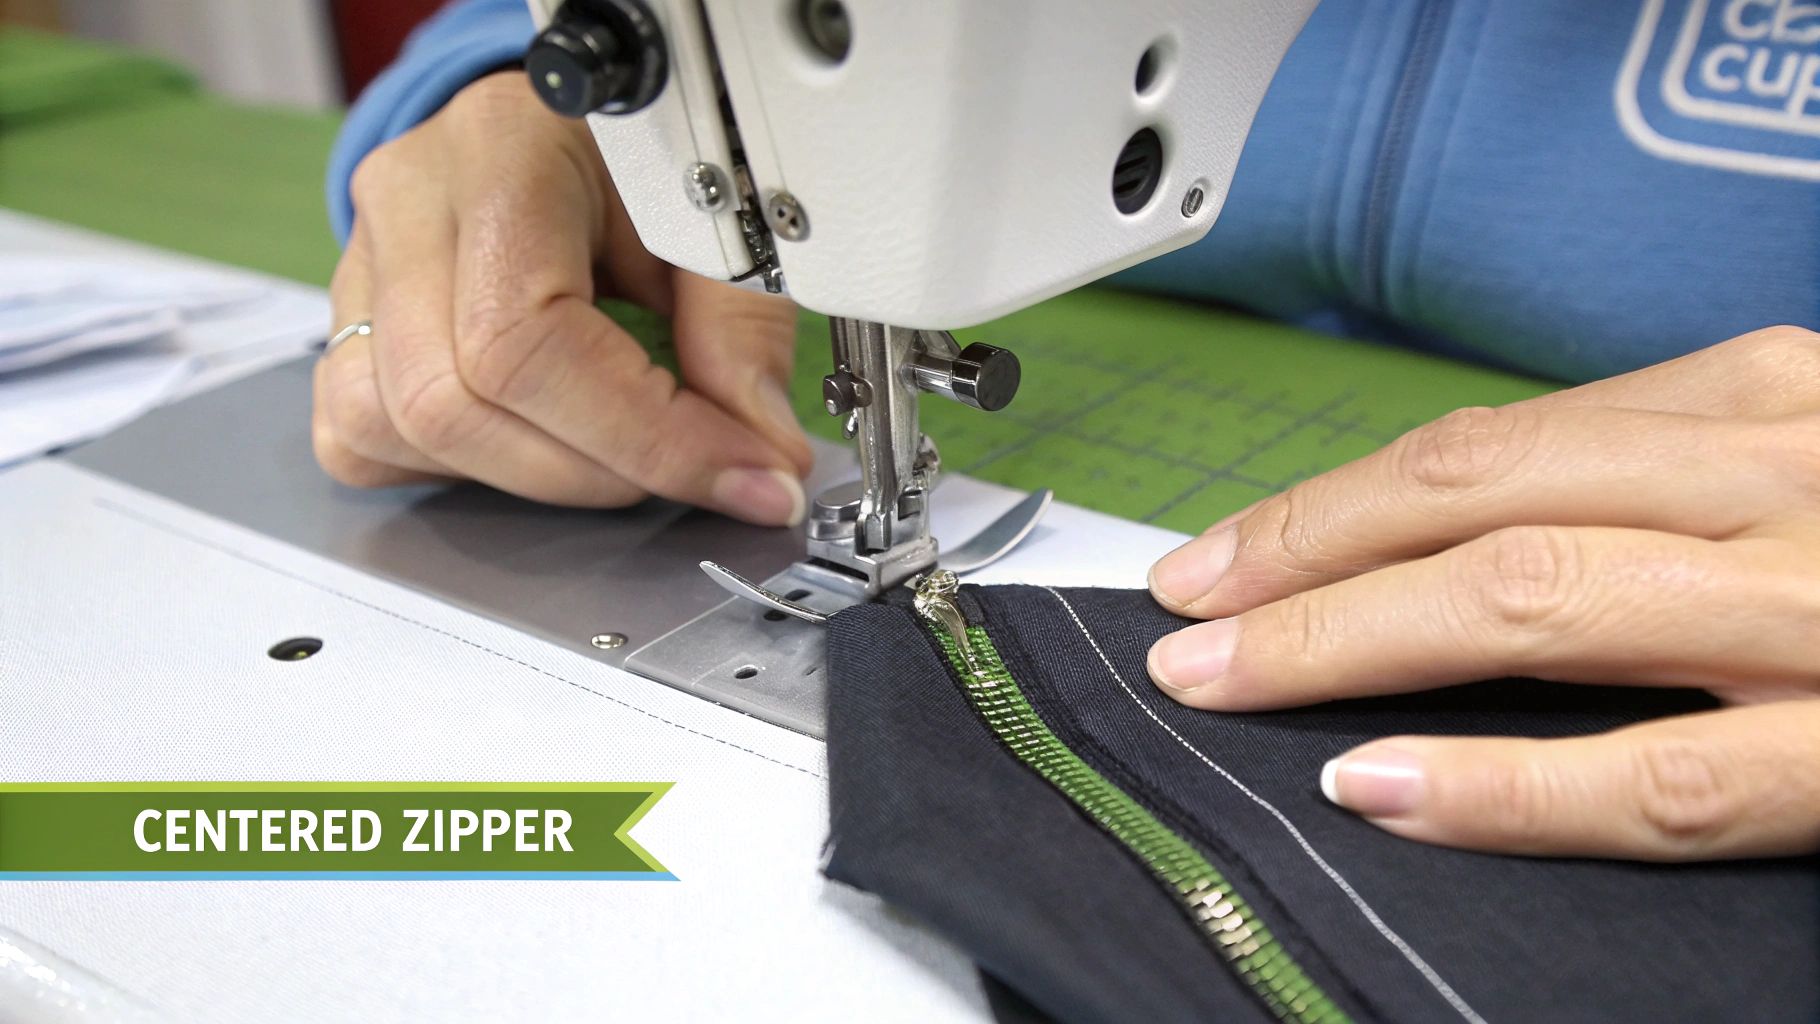
Stitching the Zipper in Place
With the zipper taped down on the inside of your garment, it's time to sew. You'll need your standard zipper foot for this, as it lets you get that stitch line nice and close to the zipper teeth.
I always start my topstitching at the bottom of the zipper and work my way up. I find this helps prevent the fabric from shifting and creating a weird bubble at the base, which can happen if you start from the top.
Begin by stitching across the bottom, just below the zipper stop. When you get to the corner, stop with your needle down in the fabric, lift the presser foot, and pivot the whole thing 90 degrees. This little move is the key to getting a sharp, perfect corner every single time.
Stitch up one side, keeping your sewing line an even distance from the centre seam. Then, do the exact same thing for the other side—start at the bottom again and stitch up to the top. This ensures everything looks balanced.
Finishing Touches for a Polished Look
Once the sewing is done, you get the satisfying job of removing the basting stitches. Just grab your seam ripper and carefully snip those long threads from the outside. They should pull out easily and reveal your beautifully installed zipper.
For a truly professional finish, give the whole area one last press with your iron. Be sure to use a pressing cloth to protect the zipper teeth from the heat, especially if they’re plastic. This final press helps the stitches settle into the fabric and gives it that crisp, ready-to-wear look.
And there you have it! You’ve learned how to install a zipper using the classic centred method. It's a reliable technique that will quickly become second nature with a bit of practice.
The Polished Look of a Lapped Zipper
When you're ready to move beyond the basic centred zipper, the lapped zipper is a brilliant technique to have in your sewing arsenal. It’s my go-to for the side or back of dresses, skirts, and trousers—anywhere you want a more discreet, professional closure. This method creates a single flap of fabric that completely hides the zipper, giving you a clean, flat finish that just looks expensive.
Unlike the two perfectly matched flaps of a centred zipper, a lapped installation is intentionally asymmetrical. The real beauty here is that you only see one line of topstitching on the finished garment, making it far less noticeable. It might sound a bit fiddly, but it’s a surprisingly simple process once you get the hang of the unique seam prep. As with most things in sewing, the secret is all in the pressing.
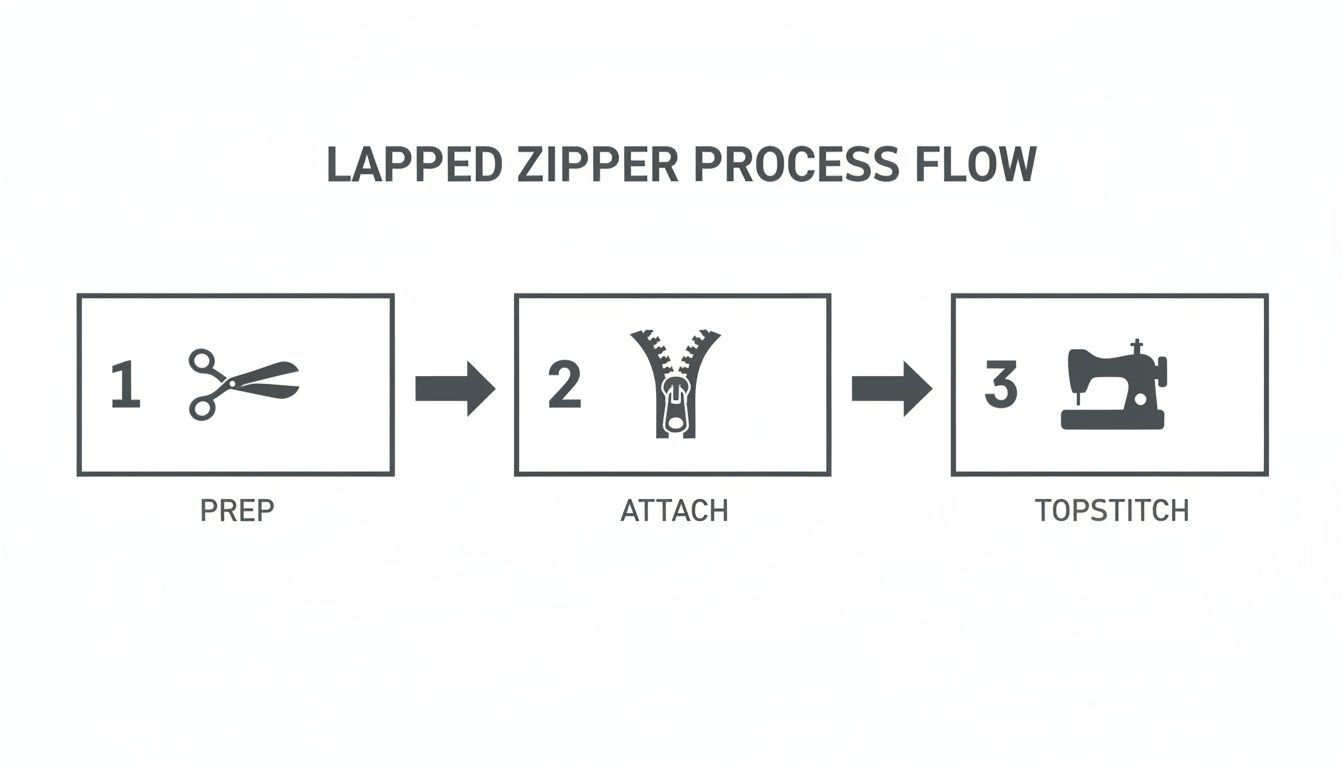
Prepping the Seam for the Lap
The real magic of a lapped zipper happens before you even pick up the zipper itself. It all starts with how you prepare the seam. First things first, go ahead and finish the raw edges of your seam allowances separately. A quick run through the serger or a simple zigzag stitch will do the trick. This is important because, unlike other zipper methods, these seam allowances won't be pressed open together.
Now, you’re ready to sew the seam. A standard 1.5 cm (5/8 inch) seam allowance is perfect for this.
- Baste the opening shut: Just like with a centred zipper, use a long basting stitch (I set mine to 4.0 mm) to sew the part of the seam where the zipper will go. Remember, no backstitching here!
- Sew the rest of the seam: When you reach the point where the zipper will end, switch back to your regular stitch length (around 2.5 mm), lock it in with a backstitch, and finish sewing the rest of the seam.
- Press to one side: This is the game-changing step. Take the entire seam allowance—both layers—and press it toward the side that will eventually be the underlap (the side you’ll attach the zipper to first).
This one-sided pressing is what creates the perfect foundation for the "lap" that will cover the zipper teeth.
Attaching and Topstitching
With your seam beautifully prepped and pressed, it’s time to bring in the zipper. You’ll just need your standard zipper foot for this. You'll start on the wrong side of the fabric.
Open up the zipper and lay it face down right on top of that underlap seam allowance you just pressed. You want the zipper teeth to be snuggled up right next to the seam line. Pin it in place, or if you prefer, use some fabric clips to hold it steady. Now, using your zipper foot, stitch that side of the zipper tape directly onto the seam allowance. Get as close as you can to the teeth without stitching over them.
A mistake I see all the time is stitching through both the seam allowance and the main garment fabric here. For this first pass, you want to attach the zipper tape only to the seam allowance. This keeps the front of your project perfectly clean.
Now, close the zipper and flip your project over to the right side. The zipper is now neatly tucked underneath, hidden by the basting stitches. Smooth the fabric over the zipper to form the lap. Make sure everything is lying flat and taut, then pin it down securely.
From the outside, you’ll topstitch along the side and bottom of the zipper, forming a little "L" shape. I find that stitching about 1 cm (3/8 inch) away from the centre seam gives a really polished look. When you get to the bottom corner, leave your needle down in the fabric to pivot for a perfectly sharp turn.
The final step is the most satisfying! Grab your seam ripper and carefully remove those temporary basting stitches. Your beautifully concealed lapped zipper is now revealed.
A Quick Tip for Bulky Fabrics
Working with something heavier, like denim, corduroy, or a thick wool? A standard lapped zipper can sometimes look a bit puffy. That extra layer of fabric in the lap can create a ridge you just don't want.
Here’s a little trick I use to get a flatter finish. After you've attached the zipper, carefully grade the seam allowance on the underlap side by trimming it down by about half. This simple step removes just enough bulk to let the lap lie beautifully flat, giving you that sleek, professional look even on your heaviest fabrics.
Mastering the Invisible Zipper for a Seamless Look
If you're aiming for that high-end, professionally made look in your garments, the invisible zipper is your best friend. When you get it right, it completely disappears into the seam, giving you a flawless finish that’s perfect for dresses, skirts, and tailored trousers. It might look tricky, but the process is actually quite straightforward once you get the hang of it.
The main trick? You sew the zipper onto the open, pressed seam allowances before you even stitch the main seam. This is the secret that makes the whole thing work so beautifully.
The Most Important First Step: Pressing the Coils
Before you even think about sitting down at your machine, head over to your ironing board. The most critical part of installing an invisible zipper is prepping the zipper itself. You need to gently unroll the plastic coils and press them flat.
Set your iron to a medium heat setting—anything hotter and you risk melting the teeth. Carefully press the coils away from the zipper tape until they lie flat. This simple move is what allows your machine's needle to get right up against the coils, which is the key to making the zipper truly invisible.
I can't stress this enough: do not skip pressing the coils. This one step is the difference between a zipper that vanishes into the seam and one that leaves a lumpy, obvious ridge. It takes all of thirty seconds and makes a world of difference.
Stitching the First Side
Alright, now you're ready to sew. Start by laying one side of the open zipper tape face down on the right side of your fabric. Line up the edge of the tape with the raw edge of the fabric. The flattened coils should sit right on your seam line.
Pin or clip the zipper in place to keep it from shifting. Now, pop on your invisible zipper foot. This specialized foot is a game-changer; it has two little grooves on the underside that are perfectly designed to guide the coils right under the needle.
Fit the flattened coils into the left groove of the foot and start stitching. The foot really does most of the work for you, keeping your stitch line perfectly straight and snug against the teeth. Sew from the top of the zipper down to the zipper stop, and don't forget to backstitch at the start and finish.
It makes sense that getting this right is so important. The Canadian apparel scene values strong construction; sewing thread for garments hit USD 115.7 million in 2024, with durable polyester thread being essential for strong zipper installations. We see why firsthand at All About Sewing—zippers are a common point of failure, accounting for roughly 28% of the 10,000+ machine service calls we've handled in 25 years. You can read the full research about the Canadian sewing thread market to see the bigger picture.
Attaching the Second Side
With one side down, it's time for the other. This is the part that often trips people up, but it's simpler than it looks. Close the zipper for a moment and lay the unsewn side of the tape face down on the other piece of fabric, again, lining it up with the raw edge.
Double-check that there are no twists and that any important pattern lines or waist seams match up perfectly. Pin this side down, then open the zipper all the way again.
Back at your machine, you'll do the exact same thing, but mirrored. This time, guide the zipper coils through the right groove of your invisible zipper foot. Stitch from top to bottom, just like you did before. And just like that, both sides of your zipper are securely attached to your seam allowances.
Sewing the Final Seam
You're on the home stretch! It's finally time to close the seam below the zipper. Zip it up to make sure everything is aligned properly. With the fabric pieces right sides together, pin the rest of the seam.
For this last bit of sewing, you’ll need to switch back to your standard zipper foot. Push the bottom tail of the zipper out of the way so you don't sew over it. Start your seam just a hair above and to the side of where your zipper stitching ends. You want to get as close as you possibly can to that last stitch without hitting the zipper teeth.
Sew the rest of the seam using your standard seam allowance, backstitching at the top to lock it in place. Give the seam a good press, and you're done! You've just installed a perfect invisible zipper.
Putting in a Separating Zipper for Jackets and Outerwear
Separating zippers are the go-to for jackets, hoodies, and anything that needs to open completely. They can seem a bit tricky at first because, unlike other zippers set into a closed seam, these demand perfect alignment from top to bottom. But don't worry—the process is very straightforward, and with a couple of key tricks, you can get a professional-looking finish that will last.
The main difference here is that you're working with the front opening of a garment. This area is usually finished with a facing or a full lining, which is what gives a jacket that clean, polished edge. Before you even touch the zipper, though, your first job is to make sure this opening is stable.
Prep the Garment Opening
Stability is everything for an outerwear zipper. Think about it: the front edges of a jacket get pulled and zipped constantly. If that fabric isn't reinforced, it will stretch, warp, and pucker over time, giving you that dreaded wavy zipper look.
This is where a little bit of interfacing makes a huge difference. Always apply a strip of fusible interfacing to the wrong side of the fabric where your zipper will go. If your jacket has a facing, iron it onto the facing piece. If you're working on a simple fleece hoodie, just apply it directly along the front opening. This one small step provides the structure needed for a crisp, flat installation.
Nothing is more frustrating than finishing a jacket, zipping it up, and finding the neckline and hem don't match. This is almost always caused by a tiny alignment issue right at the beginning. Taking an extra minute to pin carefully and double-check will save you a world of headaches later.
Align and Pin Both Sides of the Zipper
Getting a perfect separating zipper is all about alignment. Start by laying your jacket flat with the right side facing up. Take one half of your closed zipper and place it face down along one edge of the jacket opening. The zipper teeth should be pointing away from the raw edge and toward the centre of the garment.
Make sure the top zipper stop sits just right, below the neckline seam allowance, and that the bottom lines up perfectly with the hem. Pin this side down securely. Now, close the zipper and use a fabric marker to make little marks on the unpinned zipper tape at key spots—like the waistline seam or the top of a pocket.
Unzip it completely. Place the second zipper half face down on the other side of the jacket opening. Now, just match up the marks you made with the corresponding points on the garment. This simple trick guarantees that both sides will be a perfect mirror image when you're done.
It's a small detail, but mastering it has a big impact. This skill is directly connected to Canada's thriving cut-and-sew clothing manufacturing industry, which generated $2.3 billion in revenue in 2023. For home sewists here in Barrie, Ontario, and our customers at All About Sewing, knowing how to properly install a zipper means you can tackle repairs on garments from this massive industry, where zippers can fail 15-20% of the time due to heavy use. You can learn more about the Canadian manufacturing sector's impressive output to see the full picture.
Topstitch for a Strong, Clean Finish
Once both sides are pinned, you're ready to sew. Typically, you'll stitch the zipper to the main fabric first and then enclose the raw edge with the facing or lining. Pop on your standard zipper foot and stitch each zipper half in place, getting as close to the teeth as you comfortably can.
After you've attached the facing or lining and turned everything right side out, the final step is topstitching. This is what locks all the layers together and gives your outerwear that clean, durable edge.
If you're working with bulky fabrics like fleece or anything quilted, I can't recommend a walking foot enough for this step. It prevents the layers from shifting around, giving you an even feed and perfectly straight stitches. This final detail is what elevates a homemade jacket to look truly store-bought.
Common Zipper Questions Answered
Even with a great tutorial in hand, zippers can throw you a curveball. It happens to everyone! Over my years of sewing and teaching, I’ve seen the same few issues trip people up time and time again. So, let's get ahead of them.
Think of this as your personal troubleshooting cheat sheet. I’m going to walk you through the questions I hear most often so you can sew your next zipper with total confidence.
How Do I Choose the Right Zipper Length?
This is probably the number one question I get. The simple rule is to measure your finished opening and buy a zipper that’s either the exact length or, my personal preference, a little bit longer. In fact, I almost always tell people to buy a zipper that’s a few centimetres longer than they think they need.
Why? It’s a hundred times easier to shorten a zipper than to fudge one that’s too short. A longer zipper gives you wiggle room and makes it so much easier to move the zipper pull out of the way when you’re sewing right up at the top.
Shortening a zipper is no big deal:
- For plastic zippers: Just hand-sew a new stop with a tight bar tack (a few stitches back and forth) across the coils where you want the new bottom to be. Then, you can snip off the excess tape about an inch below your new stop.
- For metal zippers: You’ll need a pair of needle-nose pliers for this. Gently wiggle and pull off the extra metal teeth one by one. Once they’re gone, you can re-attach the original metal stop at your new, shorter length.
This little trick ensures a perfectly customized fit for any project you’re working on.
What Causes Fabric to Pucker Around My Zipper?
Ah, the dreaded puckering—that wavy, bumpy mess that can show up along your stitch lines. It’s frustrating, but the good news is that it’s almost always preventable. The root cause is usually the same: your fabric is being stretched as you sew it to the non-stretchy zipper tape.
Puckering is your fabric’s way of telling you it needs more support. The solution isn't to sew faster or slower, but to stabilize the area before you even start stitching.
Here’s what’s likely going on and how to fix it:
- Fabric Instability: This is the big one. Always, always reinforce the seam allowance where the zipper will go with a thin strip of lightweight fusible interfacing. This simple step prevents the fabric from stretching out of shape as you handle and sew it.
- Incorrect Tension: If your machine's top thread tension is cranked up too high, it will pull on the bobbin thread from below, causing the fabric to gather. Try lowering the tension a notch and test it on a scrap first.
- The Wrong Needle: A dull or incorrect type of needle can snag and drag on fabric fibres instead of piercing them cleanly. Always start a project with a fresh needle that’s right for your fabric.
Taking care of these three things will solve puckering issues nearly 90% of the time.
Can I Put a Zipper in Stretchy Fabric?
You absolutely can! Sewing zippers into knit fabrics opens up a whole new world of comfy clothes. It just requires a slightly different approach to keep the fabric from warping and giving you that wavy, stretched-out look.
The secret, once again, is stabilization. Knits are made to stretch, so you have to tell the seam allowance not to stretch where the zipper is going. The best way to do this is by ironing a thin strip of fusible knit interfacing onto the seam allowances. This kind of interfacing has a little bit of stretch itself, so it provides support without making the area feel stiff and boardy.
Here’s your checklist for success with knits:
- Stabilize: Don’t skip this! Use fusible knit interfacing along the seam allowance.
- Use a Ballpoint Needle: This needle is designed with a rounded tip to slide between the knit fibres instead of breaking them.
- Select a Narrow Zigzag Stitch: A tiny zigzag (think 0.5 mm width and 2.5 mm length) gives the seam just enough stretch to move with the fabric, which prevents threads from popping later.
Follow these steps, and you'll be able to install a perfect, pucker-free zipper in anything from a jersey dress to a cozy fleece hoodie.
At All About Sewing, we have all the tools you need to master any zipper installation, from specialized presser feet to the perfect interfacing. Explore our collection of sewing notions and accessories and get everything you need for a flawless finish on your next project.


