


Embroidery Machine for Beginners: How to Choose the Best One
So, you're ready to dive into the amazing world of machine embroidery? It’s a fantastic place where your creative sparks can come to life in thread and fabric. An embroidery machine for beginners is a bit like a high-tech, artistic printer. Instead of ink on paper, it uses a digital design to stitch intricate patterns onto almost any material you can imagine.
This opens up a whole universe of possibilities for making things your own.
Your First Step Into Machine Embroidery
At first glance, embroidery machines might look a little intimidating, but they’re much more approachable than you think and can truly elevate your craft projects. It’s a beautiful blend of technology and textiles. You come up with the vision—a sharp monogram, a delicate floral pattern, a custom logo—and the machine brings it to life with a speed and precision that’s simply impossible to achieve by hand.
Think of this guide as your personal roadmap, here to help you move from curious to confident.
This craft is perfect for adding that personal flair to just about anything, from custom-designed clothes and home décor to one-of-a-kind gifts that people will treasure. We're going to break it all down, starting with the basics, to show you just how quickly you can be creating professional-looking pieces you'll be proud of. Our main goal here is to get you excited and prepared to start your journey with the right skills and tools.
What to Expect on Your Journey
Getting started is about more than just picking a machine. It's about learning the whole process, from the right supplies to the best techniques for getting great results. You'll learn how to choose the perfect threads and get familiar with stabilizers, which are the secret foundation behind every crisp, clean embroidery design. Building these skills step-by-step is part of the fun.
For anyone who wants to build a really solid foundation, taking a structured course can make a world of difference. Our guide on sewing machine classes for beginners is a great resource for hands-on learning.
There's a special kind of magic in watching your very first design stitch out perfectly. It’s that rewarding "I made this!" moment that shows you this craft is for anyone with a creative itch, not just the experts.
The Canadian Market for Beginners
Here in Canada, the embroidery scene is buzzing and growing, which is great news for anyone just starting out. This boom is driven by a huge interest in personalized clothing and custom promotional gear. As a result, there's a fantastic selection of compact, user-friendly single-head machines that are perfect for hobbyists or even a small home business.
To give you an idea of the scale, the Canadian industrial embroidery machine market alone was valued at around USD 89 million in 2024. You can read the full research about the embroidery machine market if you want to dig into the trends. This healthy market means beginners have access to top-notch technology and, just as importantly, great local support.
How an Embroidery Machine Actually Works
Ever peeked at a beautifully embroidered design and wondered how a machine pulls off such perfect, intricate stitches? Let's lift the hood and see what’s really going on. The easiest way to think about it is like this: your embroidery machine is a super-precise robotic artist. You give it a digital design file—its map—and it follows that map perfectly with a needle and thread.
The whole thing is a beautiful dance of different parts working in sync. It’s not magic, though it sure feels like it the first time you watch a design stitch itself out. The machine reads the digital file, which tells it exactly where to place every single stitch, what colour of thread to use, and even when to snip the thread.
At the heart of this process are two main players: the embroidery hoop and the machine’s automated arm. These two work together to make sure every stitch lands exactly where it’s supposed to, turning a plain piece of fabric into a little work of art.
The Hoop and The Arm: A Perfect Partnership
The first thing you do on any project is lock your fabric into an embroidery hoop. This isn't just a simple frame; its job is absolutely critical. The hoop holds the fabric tight and flat, keeping it completely taut. If there were any wrinkles or slack, your final design would look warped and messy. A well-hooped piece of fabric is truly the foundation of a great-looking project.
Once it's hooped, you snap it onto the machine's embroidery arm. This is where the magic really starts. With a regular sewing machine, you’re the one pushing the fabric around. An embroidery machine flips that completely. The needle just bobs up and down in one spot, while the computer-guided arm moves the hoop left, right, forward, and back with incredible precision.
It's this perfectly coordinated movement that "draws" the design onto your fabric, one stitch at a time. This level of automation is what lets even a total embroidery machine for beginners produce professional-looking results right from your very first try.
This diagram gives you a great visual of how the key elements—your machine, fabric, and digital design—all come together to create your finished piece.
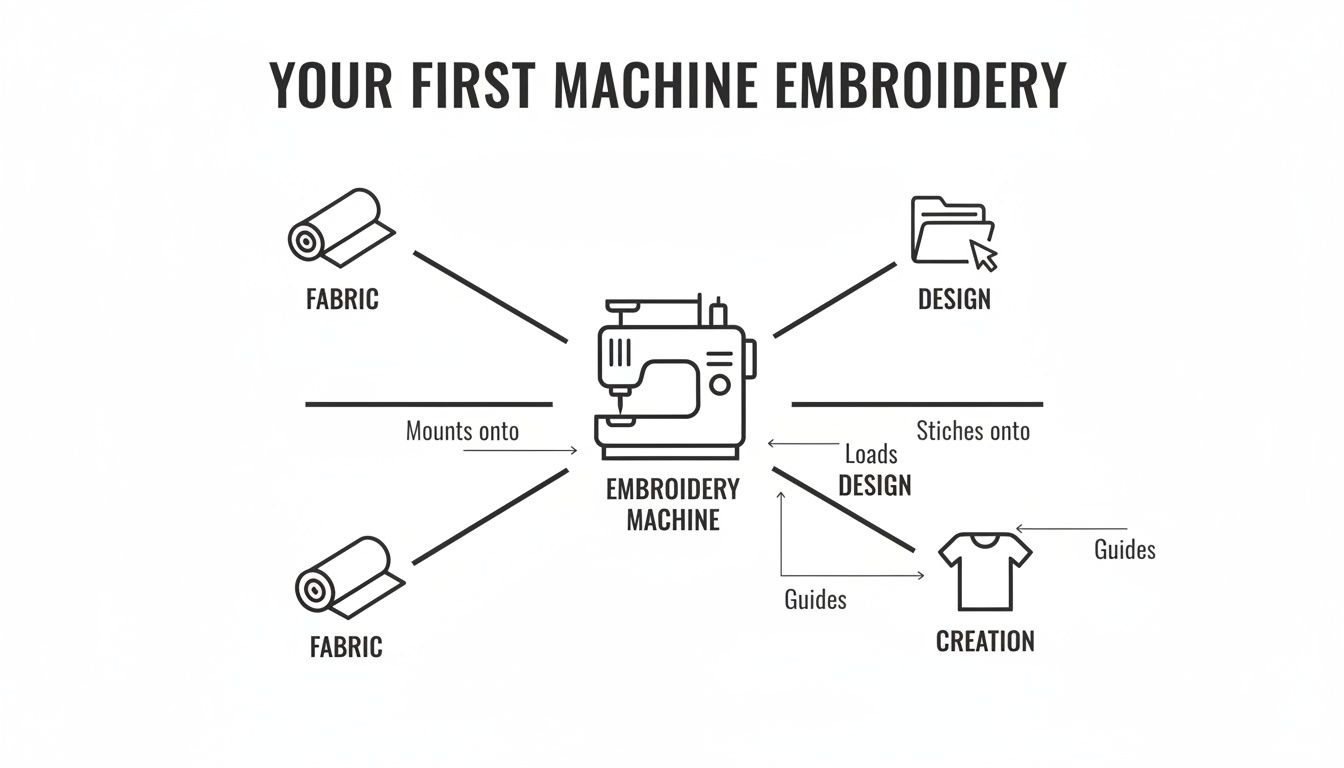
As you can see, the machine is the engine that brings a digital idea to life on a physical piece of fabric.
Understanding Key Concepts
To really get the hang of this, there are a couple of other key terms you’ll hear a lot. The most important one is stabilizer. Think of it as a temporary support system for your fabric. It’s a special material you place behind your main fabric to stop it from stretching or puckering while it's being stitched on.
Stabilizers come in a few different flavours, but here are the main ones you'll use as a beginner:
- Cut-Away: This one is permanent. After stitching, you just trim the excess away from the edge of your design. It gives the most support, making it perfect for stretchy fabrics like t-shirts and sweatshirts.
- Tear-Away: Just like it sounds, this stabilizer tears away easily once you're done. It's the go-to for stable, woven fabrics that don't stretch, like cotton or denim.
- Wash-Away: This type disappears completely with a bit of water, leaving nothing behind. It's fantastic for delicate fabrics or projects where you don't want any backing to show, like on towels or lace.
Another big one is hoop size. This simply determines the biggest design you can stitch out at one time. A common starter size is 4x4 inches, which is plenty for names, monograms, and small logos. As you get more ambitious, you'll find that larger hoops, like 5x7 inches or more, let you tackle bigger and more complex pieces without having to move and re-hoop your fabric.
A fantastic embroidery result comes down to the right combination of fabric, stabilizer, a quality design, and a well-hooped project. Honestly, getting these things right is more important than any button or setting on the machine itself.
Choosing Your Machine Type
As you start looking, you’ll quickly notice that embroidery machines come in two main styles: dedicated embroidery-only models and combination sewing-and-embroidery machines. Each has its own set of pros and cons, and the best one for you really depends on your creative goals and how much space you have.
Here's a quick breakdown to help you decide.
| Feature | Dedicated Embroidery Machine | Combination Sewing & Embroidery Machine |
|---|---|---|
| Primary Function | Embroidery only. | Both sewing and embroidery. |
| Best For | People who only want to embroider or already own a sewing machine. | Beginners, hobbyists with limited space, or anyone wanting an all-in-one. |
| Embroidery Area | Often offers larger hoop sizes and a more open workspace. | Typically has small to medium hoop sizes (e.g., 4x4 or 5x7 inches). |
| Space Requirement | A separate machine, so it takes up its own dedicated spot. | One machine does it all, saving valuable table space. |
| Switching Functions | N/A - Always ready for embroidery. | Requires swapping out the presser foot for the embroidery unit. |
| Price Point | Can be more expensive for comparable embroidery features. | Often a great value, giving you two machines in one package. |
A dedicated embroidery machine is a specialist—it does one thing, and it does it incredibly well. These are workhorses built specifically for embroidery, often with bigger hoops and beefier components.
A sewing-and-embroidery combo machine, on the other hand, is the ultimate multitasker. It works as a great sewing machine for all your regular projects, but you can attach the embroidery unit and hoop when you’re ready to get creative. For anyone starting out, especially if you also want to sew, a combo model is a fantastic and flexible choice.
Must-Have Features for Your First Machine
Walking into the world of embroidery machines can feel a little overwhelming at first. You're suddenly faced with a long list of features and technical specs that sound like a foreign language. But here's the good news: for a beginner, only a handful of features really matter.
These are the ones that will make the difference between a frustrating afternoon and falling in love with a new craft. Think of this as your no-nonsense guide to what's truly essential when you're just starting out. We'll skip the jargon and get right to what will make your life easier.
A Friendly Interface and On-Screen Editing
The most important thing to look for is a machine that’s easy to get along with. A clear, intuitive LCD touchscreen is your command centre, letting you pick designs, choose thread colours, and make quick adjustments without any fuss.
Look for a model that offers basic on-screen editing. Honestly, this is a beginner’s best friend. It gives you the power to tweak a design right on the machine’s screen, so you don’t have to run back and forth to a computer for every little change.
Typically, this means you can:
- Rotate and Mirror: Flip a design left to right or top to bottom to get the placement just right.
- Resize: Make a design a bit bigger or smaller to fit your project perfectly (usually within a 10-20% range, so the stitches still look great).
- Combine Designs: Add a letter to a small floral design to create a custom monogram, all on the machine itself.
This feature saves a ton of time and lets you get creative with the built-in designs right out of the box.
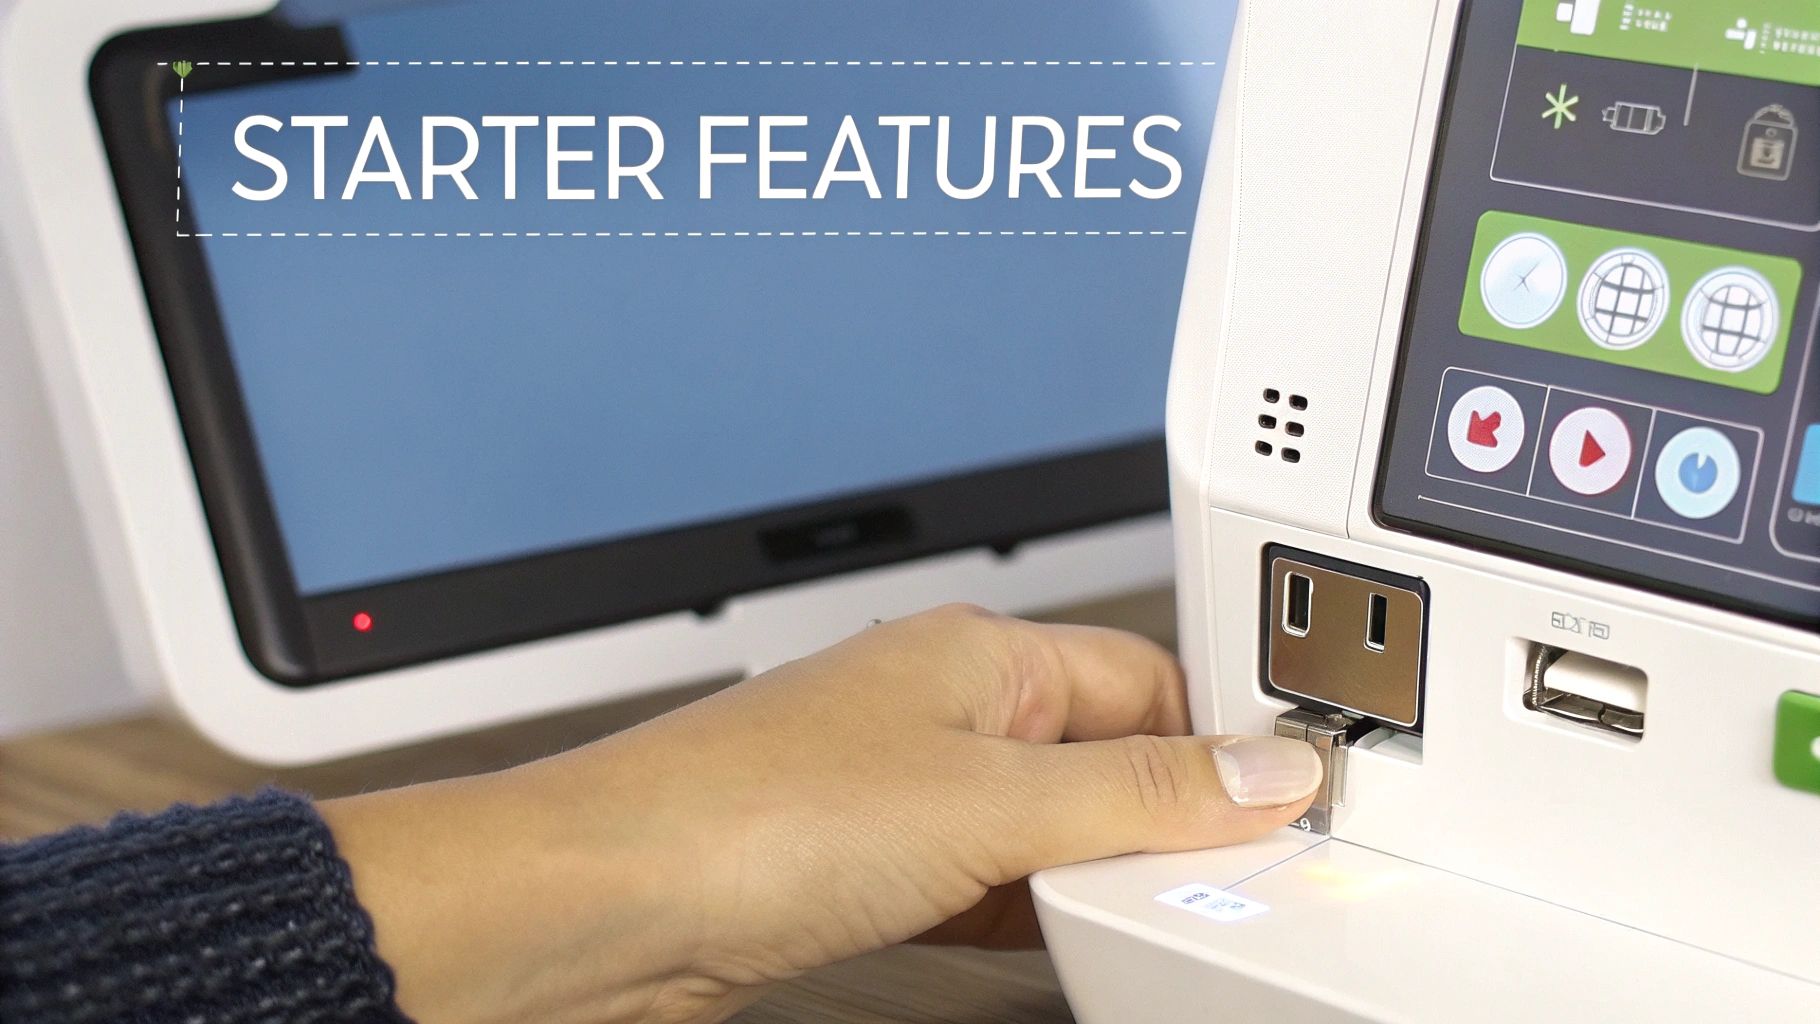
Effortless Threading and Easy Design Transfers
There are two little features that will save you from major headaches: an automatic needle threader and a simple way to get designs onto your machine. They might seem small, but trust me, they're huge.
An automatic needle threader does exactly what it says—it pushes the thread through that tiny needle eye for you. No more squinting or struggling! It’s a simple mechanism that removes one of the most common frustrations for new stitchers.
Just as important is connectivity. Gone are the days of needing special memory cards. Today, you want a machine with a USB port. This lets you download thousands of incredible designs online, pop them onto a regular USB stick, and plug it straight into your machine. It’s the easiest way to grow your collection beyond what came pre-loaded. Some newer models even have Wi-Fi.
The best beginner machine is one that removes barriers. Features like automatic threading and USB ports aren't just conveniences; they are what keep you excited and stitching instead of getting bogged down by tedious setup tasks.
Understanding Hoop Size
The hoop size sets the maximum area you can embroider at one time. For someone just starting, a 4x4 inch (or 100x100mm) hoop is the perfect place to begin. It might sound small, but it’s large enough for tons of popular projects:
- Monogramming towels and shirt pockets
- Putting a name on a baby onesie
- Adding a small logo to a cap or bag
- Creating fun little patches
Starting with a 4x4 hoop keeps things manageable. Getting the fabric tight and even in the hoop (called "hooping") is a skill in itself, and smaller hoops are much easier to master. While a bigger 5x7 inch hoop is tempting, it also requires more fabric, more stabilizer, and more precision. The 4x4 area lets you nail the basics without feeling overwhelmed.
To help you keep track of what to look for, here’s a quick checklist.
Beginner-Friendly Feature Checklist
This table breaks down the key features to look for when you're comparing machines, helping you see what’s essential versus what’s just nice to have.
| Feature | Why It Matters for a Beginner | Priority Level |
|---|---|---|
| LCD Touchscreen | Your main control panel. An intuitive screen makes navigating options and designs simple. | Essential |
| Automatic Threader | Eliminates the frustrating task of threading the needle, saving you time and eye strain. | Essential |
| USB Port | The easiest way to import countless designs you find online, vastly expanding your library. | Essential |
| 4x4" Hoop Size | A perfect starting size that's easy to handle and suitable for most beginner projects. | Essential |
| On-Screen Editing | Lets you make quick adjustments (resize, rotate) without needing a computer. | High |
| Built-in Designs | Gives you a library of designs to start practicing with immediately. | High |
| Automatic Tension | The machine adjusts thread tension for you, leading to cleaner stitches with less guesswork. | Nice-to-Have |
| Wi-Fi Connectivity | Allows for wireless design transfer, which is a great convenience but not essential. | Nice-to-Have |
Having this list in mind as you shop will help you focus on the features that will genuinely make your first embroidery experiences fun and successful.
The New Standard: Computerized Machines
All the features we’ve talked about—the screens, USB ports, and editing tools—are the heart of modern, computerized embroidery machines. These smart machines have taken over the market, and for a very good reason: they make embroidery accessible to everyone, not just experts with years of practice.
This shift is happening everywhere, including right here in Canada, where hobbyists and home-based businesses are a huge part of the creative community. The global market for these machines shot past USD 2.3 billion in 2024, and the advanced, user-friendly models now account for about two-thirds of all sales. Market analysts have pointed to a "growing preference for compact, user-friendly machines among small businesses and hobbyists" in Canada. You can discover more insights about these market trends on MordorIntelligence.com.
This trend is great news for you, because it means that even today's entry-level machines are packed with powerful technology that’s designed to be easy to use.
What to Expect for Your Budget
Let’s talk money. Getting into machine embroidery is an investment, but it doesn’t need to be a stressful one. Knowing what to expect at different price points helps you find that perfect machine—one that fires up your creativity without emptying your wallet. Think of it like buying your first car; you don't need a supercharged sports car, just a reliable and friendly model to learn with.
And for us here in Canada, the timing is great. The interest in beginner-friendly embroidery machines has been growing right alongside the rest of the sewing and textile market. The Canadian sewing machine market, which covers everything from home sewing to entry-level embroidery, brought in about USD $41.0 million in 2024 and is expected to hit USD $50.6 million by 2033. For you, that means more choices for starter machines, better local support, and more financing options than ever. You can dig into these Canadian market findings to see just how the industry is changing.
The Entry-Level Sweet Spot (Under $1,000)
For most people buying their very first embroidery machine for beginners, the sweet spot is usually under $1,000. These machines are built from the ground up to be easy to learn, and they come loaded with all the core features we’ve been talking about.
Here’s what you can expect to find in this price range:
- A 4x4 Inch Hoop: This is the classic starter size. It’s perfect for learning how to hoop fabric correctly and for tackling projects like personalizing tea towels, baby clothes, or tote bags.
- Built-in Designs and Fonts: Your machine will come ready to go with dozens—sometimes over 100—of pre-loaded designs and lettering styles. You can start stitching the moment you get it home.
- User-Friendly LCD Screens: Expect a clear touchscreen, often in colour, that makes it simple to pick your designs and make basic edits like rotating or resizing right on the screen.
- Core Convenience Features: Things like an automatic needle threader and a USB port for bringing in new designs are pretty much standard here, which helps eliminate some of the most common beginner frustrations.
These machines are the workhorses for hobbyists. They give you everything you need to learn the craft and create beautiful work without bogging you down with advanced features you might not touch for years.
Stepping Up to a Mid-Range Machine ($1,000 - $3,000)
Once you get the hang of things, you might start dreaming bigger. That’s when you’ll find yourself looking at mid-range machines. The biggest perk you get when you step into this price bracket is a larger embroidery area. This is where you start to see models with a 5x7 inch hoop or even larger options.
A bigger hoop is a total game-changer. It lets you stitch larger, more intricate designs without having to re-hoop your fabric, which opens up a whole new world of possibilities—think jacket backs, big decorative pillows, and more detailed artwork.
Investing in a machine is about more than just the initial purchase. It's about choosing a partner for your creative journey. That's why considering financing and local support is just as important as comparing hoop sizes.
Mid-range machines also tend to pack in more advanced features. You'll often find faster stitching speeds, more powerful on-screen editing tools, and a bigger library of built-in fonts and premium designs. They're fantastic for someone who knows they're committed to the hobby and wants a machine that will grow with them.
Making Your Investment Accessible
I know, the initial price of a quality machine can feel like a big hurdle. But it doesn't have to be.
Many local dealers, including us here at All About Sewing, offer flexible financing options. This breaks down the cost into manageable monthly payments, which can make even a mid-range machine feel much more affordable. Going this route means you can get the machine with the features you really want—like that larger hoop—from day one, instead of settling for less and wishing you could upgrade a year later. It’s a smart way to invest in a durable, high-quality tool that will bring your creative ideas to life for years to come.
Easy First Projects to Build Your Confidence
The best way to get to know your new embroidery machine is to just start stitching! Diving into small, manageable projects is the secret to building your skills without getting overwhelmed. Think of these first few creations as your training ground.
Your goal here isn't perfection. It’s about getting comfortable with the whole process—from hooping the fabric correctly to watching that final stitch get laid down. We’ve picked a few projects that give you impressive results fast, proving just how much you can create.
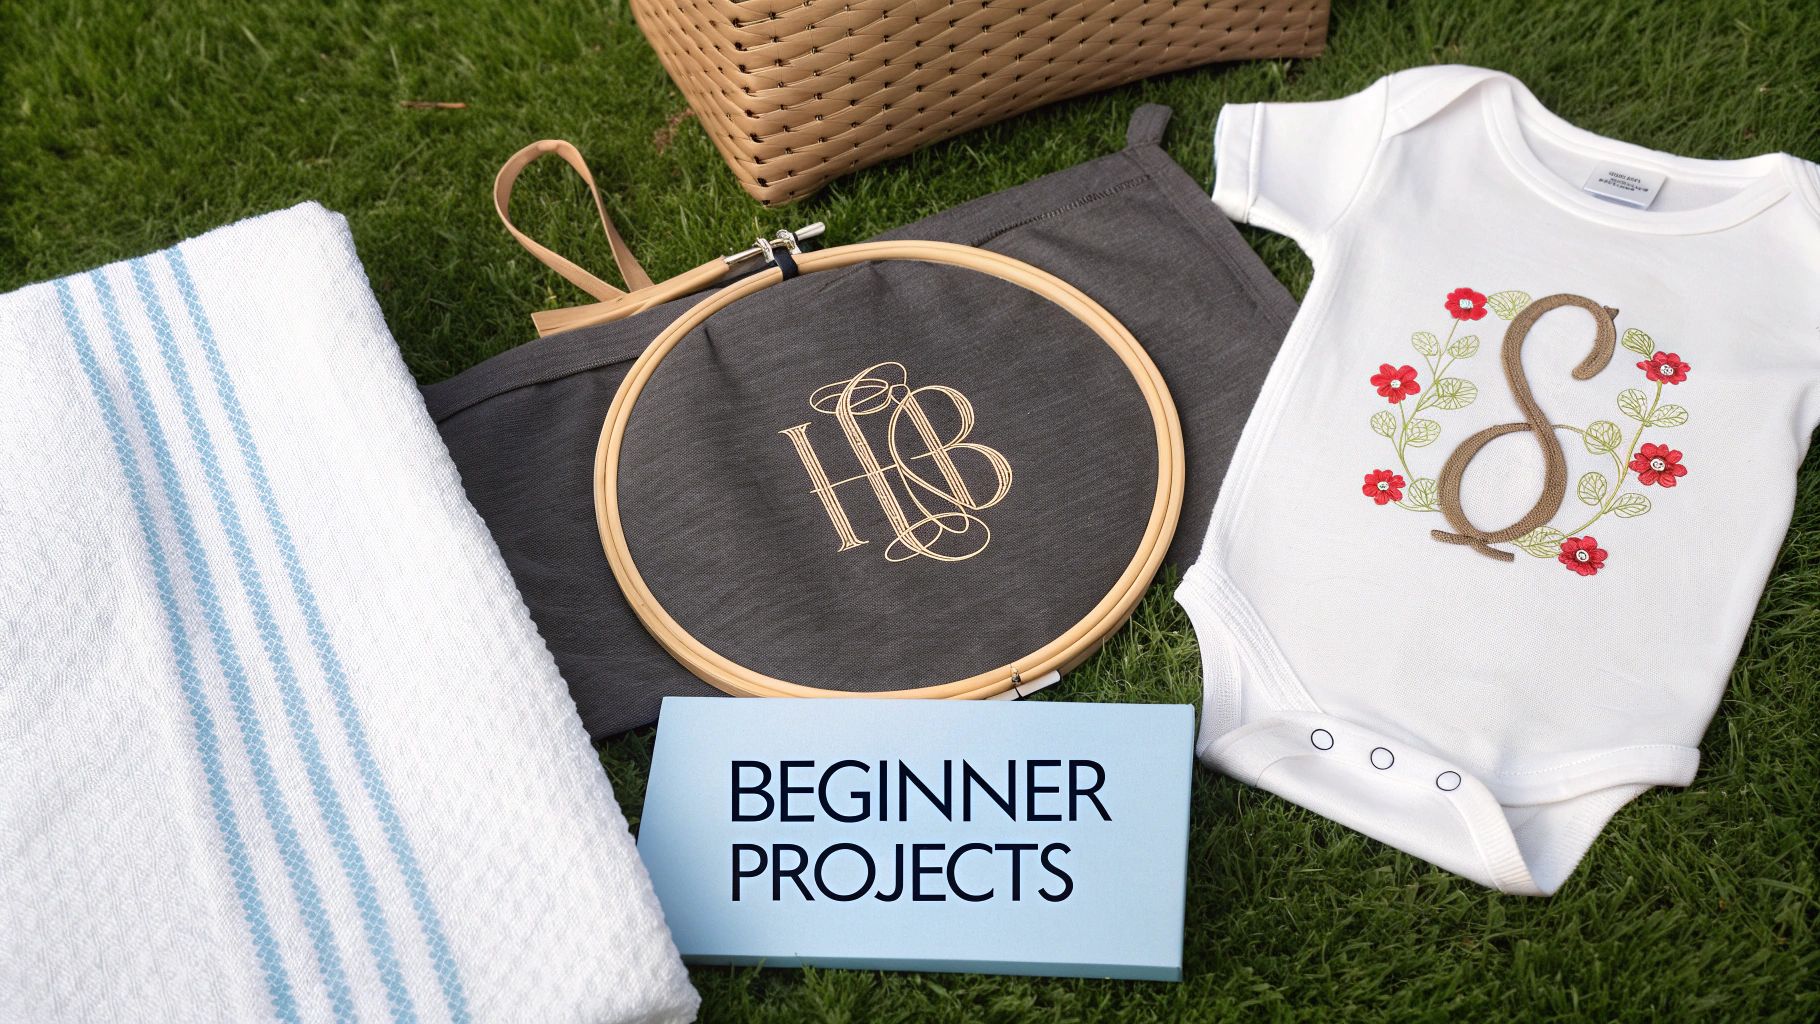
Projects Perfect for a 4x4 Hoop
One of the great things about starting with a standard 4x4 inch hoop is that it’s the perfect size for so many popular and practical projects. It’s easy to handle, uses less stabilizer, and really helps you nail the fundamentals of hooping and alignment.
Here are a few simple but satisfying ideas to get you going:
- Monogrammed Kitchen Towels: This is a classic first project for a reason! A simple set of cotton or linen tea towels provides an inexpensive canvas. Adding a single, elegant initial instantly turns them into a thoughtful, personalized gift or a beautiful touch for your own kitchen.
- Personalized Baby Onesies: Is there anything sweeter? Adding a baby’s name or a cute little design to a soft onesie is a quick and heartwarming project. Since knit fabrics are stretchy, this is a fantastic opportunity to learn how to use a cut-away stabilizer to stop the design from puckering.
- Custom Tote Bags: A sturdy canvas tote is one of the easiest things to embroider because the fabric is stable and simple to hoop. You can add a favourite quote, a fun graphic, or your initials to make a one-of-a-kind bag that’s perfect for groceries, books, or craft supplies.
Tips for a Great First Stitch-Out
As you get started, a few simple tricks can help make sure your results look professional right from the get-go. Success in machine embroidery often comes down to getting the setup right before you even press "start."
- Choose the Right Stabilizer: For a stretchy knit onesie, use a cut-away stabilizer for the best support. For stable, woven fabrics like tea towels and tote bags, a tear-away stabilizer is usually all you need.
- Pick Contrasting Thread: To really make your first designs pop, choose thread colours that stand out against your fabric. It makes your work easier to see and gives you a much more satisfying result.
- Always Do a Test Stitch: If you're not sure about your thread tension or how a design will look, stitch it on a scrap piece of similar fabric first. This five-minute step can save you the headache of unpicking an entire project later on.
Remember, the machine just follows instructions. Your real creative power lies in choosing the perfect combination of design, fabric, and thread.
When you're working on those monogramming projects, getting the lettering just right is key. For a deeper dive, check out our complete guide on how to embroider letters, which covers everything from spacing to font selection.
With these simple projects under your belt, you’ll quickly go from unboxing your machine to holding a beautifully finished item you can be truly proud of.
Why Buying from a Local Dealer Matters
Your embroidery journey doesn't end the moment you buy a machine—in fact, that's where it really begins. It can be tempting to just click "buy now" from a big online store, but choosing a local Canadian dealer like All About Sewing is the difference between buying a tool and gaining a partner for your creativity.
One of the biggest reliefs is sidestepping all those hidden costs and shipping headaches. When you buy from a Canadian dealer, the price you see is the price you pay. No surprise duty fees, no frustrating international shipping delays, and no weird currency conversion charges. It’s all handled right here, making the whole process simple and transparent.
Hands-On Guidance and Expert Support
There’s nothing quite like seeing a machine run before you decide to take it home. In a local shop, you can get a real feel for how an embroidery machine for beginners operates, ask questions on the spot, and see the features in action. Our team can show you different models and explain which features will actually make a difference for your projects, not just read a spec sheet at you.
That personal support doesn't stop once you've made your purchase. Got a question about which stabilizer to use on a tricky fabric? Need a hand figuring out a design that just won't cooperate? You have a team of real people ready to help. Having that direct line to an expert is priceless and helps you build confidence so much faster. It's like finding a great local tailor; as explained in guides on finding local bespoke suit shops, local expertise is key.
Having a trusted local partner means you're never alone in your creative process. When you're stuck on a project, a quick call or visit can provide the solution and encouragement you need to keep going.
Service, Repairs, and Continued Learning
An embroidery machine is a pretty sophisticated piece of equipment, and it needs a little TLC to keep running its best. A local dealer offers professional maintenance and repairs from technicians who are actually trained by the brands they sell. This keeps your machine in peak condition and protects your investment for the long haul.
Beyond that, local shops are often community hubs. We host beginner-friendly classes and workshops to help you get comfortable with your new machine. It's a great way to learn in a structured environment and meet other people in your area who love to embroider. You can check out different machines, and if you're curious about a specific brand, our team can give you the inside scoop on things like what to look for in Pfaff embroidery machines and how they stack up.
Here at All About Sewing, we’re more than just a store; we’re a resource dedicated to your success. Get in touch with our team, and let us show you how we can support your embroidery adventures for years to come.
Frequently Asked Questions
Jumping into a new craft like machine embroidery always brings up a few questions. That's perfectly normal! Getting good, clear answers is the best way to build your confidence before you dive in. Let's walk through some of the most common things people ask when they're looking for their first embroidery machine for beginners.
Do I Need Special Software to Start?
Not at all! This is a big myth that often stops people in their tracks. The truth is, most modern beginner embroidery machines are ready to go right out of the box. They come loaded with dozens of built-in designs and lettering fonts, so you can start stitching the moment you get it set up.
When you're ready to explore more designs, all you need is a basic USB stick. You can download thousands of incredible patterns from online shops, pop them onto the USB, and plug it straight into your machine. There is more advanced software out there for creating your own designs from scratch (a process called digitizing), but that's something you can choose to explore way down the road. It’s definitely not a day-one requirement.
How Hard Is It to Maintain an Embroidery Machine?
You’ll be happy to hear that the basic upkeep is incredibly simple and only takes a few minutes. Think of it as a little tune-up to keep your machine humming and your stitches looking sharp.
Here's what you'll need to do:
- Clean the Bobbin Area: Lint and dust love to build up here. Just take a small brush and gently clear it out regularly.
- Change Your Needle: A fresh needle is your best friend for clean, crisp stitches. A good rule of thumb is to swap it out after every 8 to 10 hours of stitching time.
Your machine's manual will have super simple, step-by-step pictures for these little jobs. For the bigger stuff, like an annual service, it’s best to leave it to a pro. Just like you'd look for an expert in guides on finding local bespoke suit shops for custom clothing, relying on a trained technician for your machine is always a smart investment.
What Are the Most Essential Supplies I Need?
Besides the machine itself, you only need a handful of things to get that first project done. This is your embroidery starter kit.
First up is embroidery thread—just grab a few basic colours to start. You'll also need stabilizers, which are special backings that keep your fabric from puckering. A roll of "cut-away" for stretchy fabrics (like t-shirts) and "tear-away" for sturdier wovens will have you covered for most projects.
Don't forget bobbins wound with bobbin thread (it's a special, finer thread for the back of your stitches) and a small pair of curved scissors for trimming threads neatly. That's it! With just these few items, you're ready to create something beautiful.
At All About Sewing, we do more than just sell machines—we're here to help you succeed. Our team offers the hands-on training, expert advice, and professional service you need to feel confident from your very first stitch. Start your embroidery journey with us today!


