

Your Guide to the Perfect DIY Picnic Blanket Pattern
Nothing beats a beautiful handmade blanket for a memorable day outdoors. This guide is all about giving you the picnic blanket pattern and the confidence to create your own. We'll go through everything together, from picking out the perfect fabrics to adding those final, professional-looking touches. Let’s move past those flimsy, store-bought blankets and sew something durable and stylish that’s built for years of family adventures.
Crafting Your Perfect Outdoor Blanket
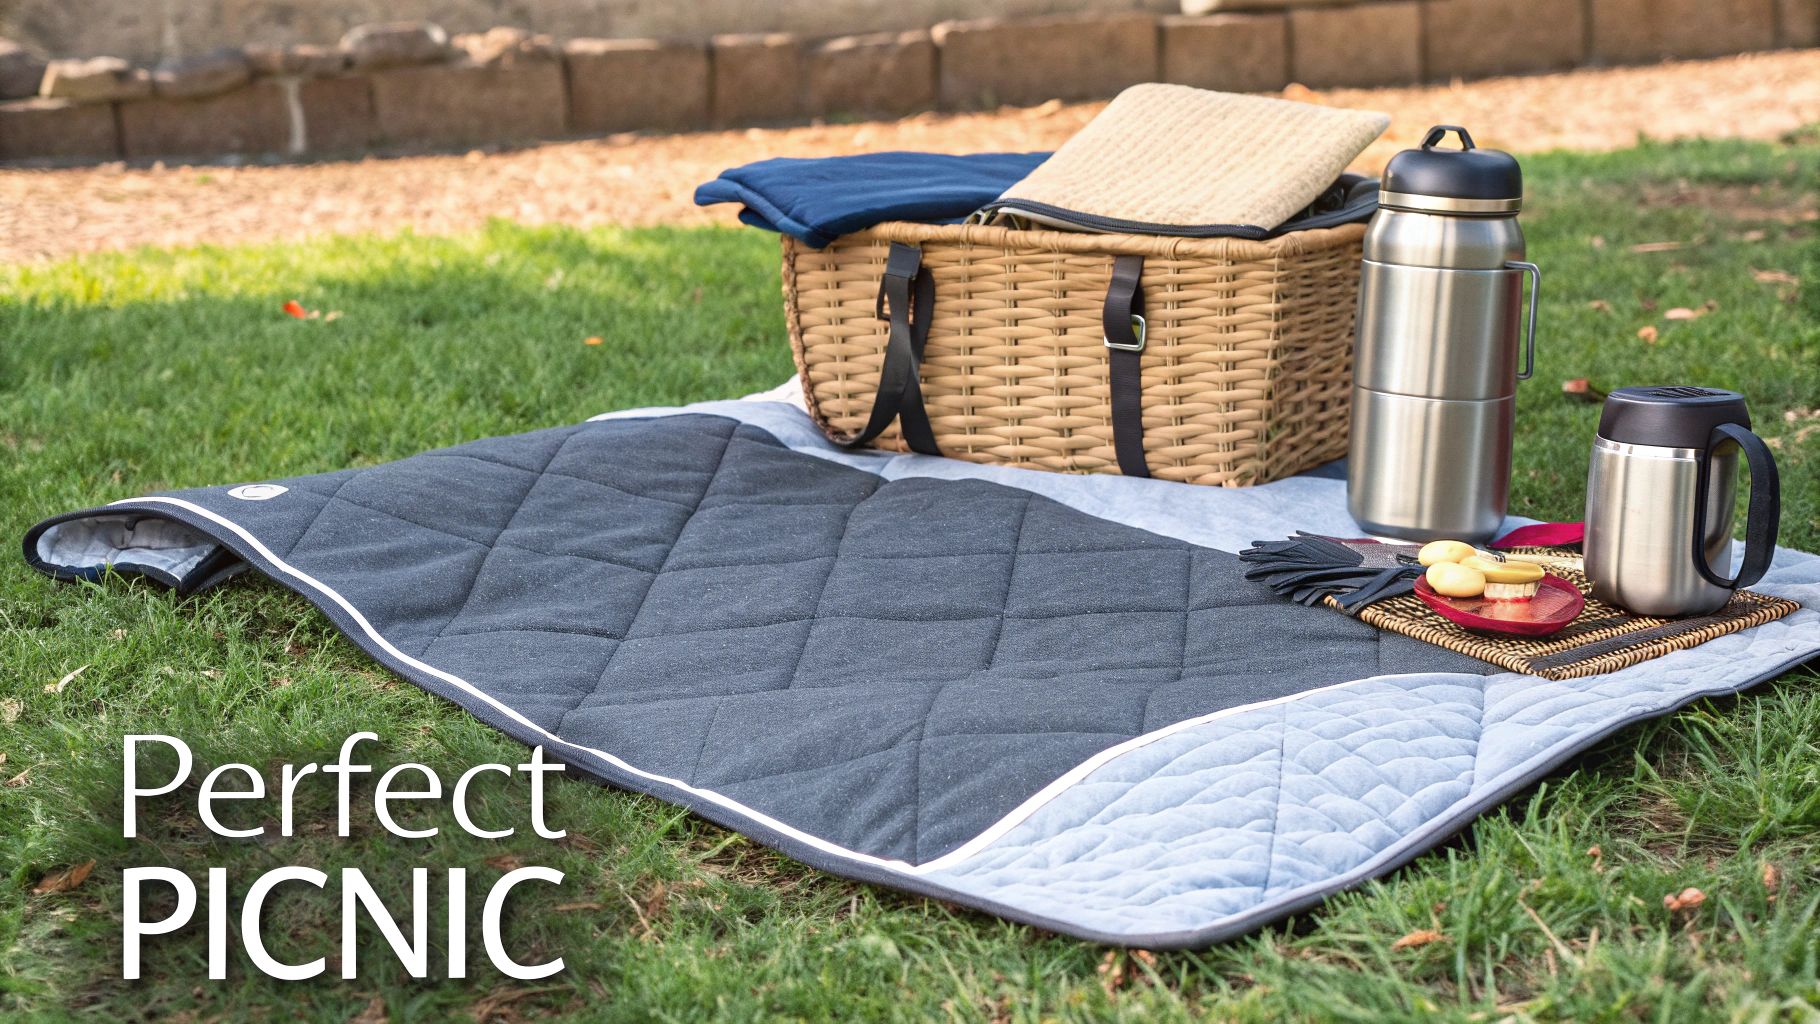
Making a custom picnic blanket is so much more than just another sewing project. It's about creating a functional piece of art that becomes part of your family’s story. Just picture pulling out a gorgeous, quilted blanket you made yourself for a sunny day at the park or a cozy evening watching the stars. This guide is here to give you that rewarding experience, with practical knowledge that goes beyond basic instructions.
I've learned that the secret to a fantastic blanket really is in the details. Choosing the right fabrics from the get-go is crucial for both comfort and durability, especially when you're dealing with unpredictable Canadian weather. A soft cotton top feels amazing to lounge on, but a tough, waterproof backing is what makes it truly practical.
Beyond the Basic Pattern
This tutorial is designed to give you the confidence to build a blanket that actually fits your life. A great picnic blanket pattern should always be adaptable. That’s why we’ll dive into:
- Handling Diverse Materials: I'll share my best tips for working with everything from soft quilting cottons to sturdy, waterproof backings without getting frustrated.
- Functional Design: We’ll look at how to make sure your blanket isn't just beautiful, but also a breeze to clean, carry, and store away.
- Customization: Let's forget the one-size-fits-all approach. You can create a blanket for any occasion, whether it’s a small throw for two or a massive spread for the whole family.
If you're looking for a little inspiration on outdoor textiles, checking out products like various beach blanket options can really get the ideas flowing. Seeing different styles helps you decide which features you really want in your own handmade project.
A well-made picnic blanket is a long-term investment in outdoor comfort. It needs to be tough enough to handle damp grass and repeated washings, yet soft enough to be inviting for an afternoon nap.
Ultimately, this guide is here to help you sew an outdoor accessory that's both beautiful and incredibly functional. Whether you’re planning a trip to the beach, a day at the local park, or just an impromptu lunch in your backyard, your handmade blanket will be ready for the adventure.
Choosing the Right Fabric and Tools
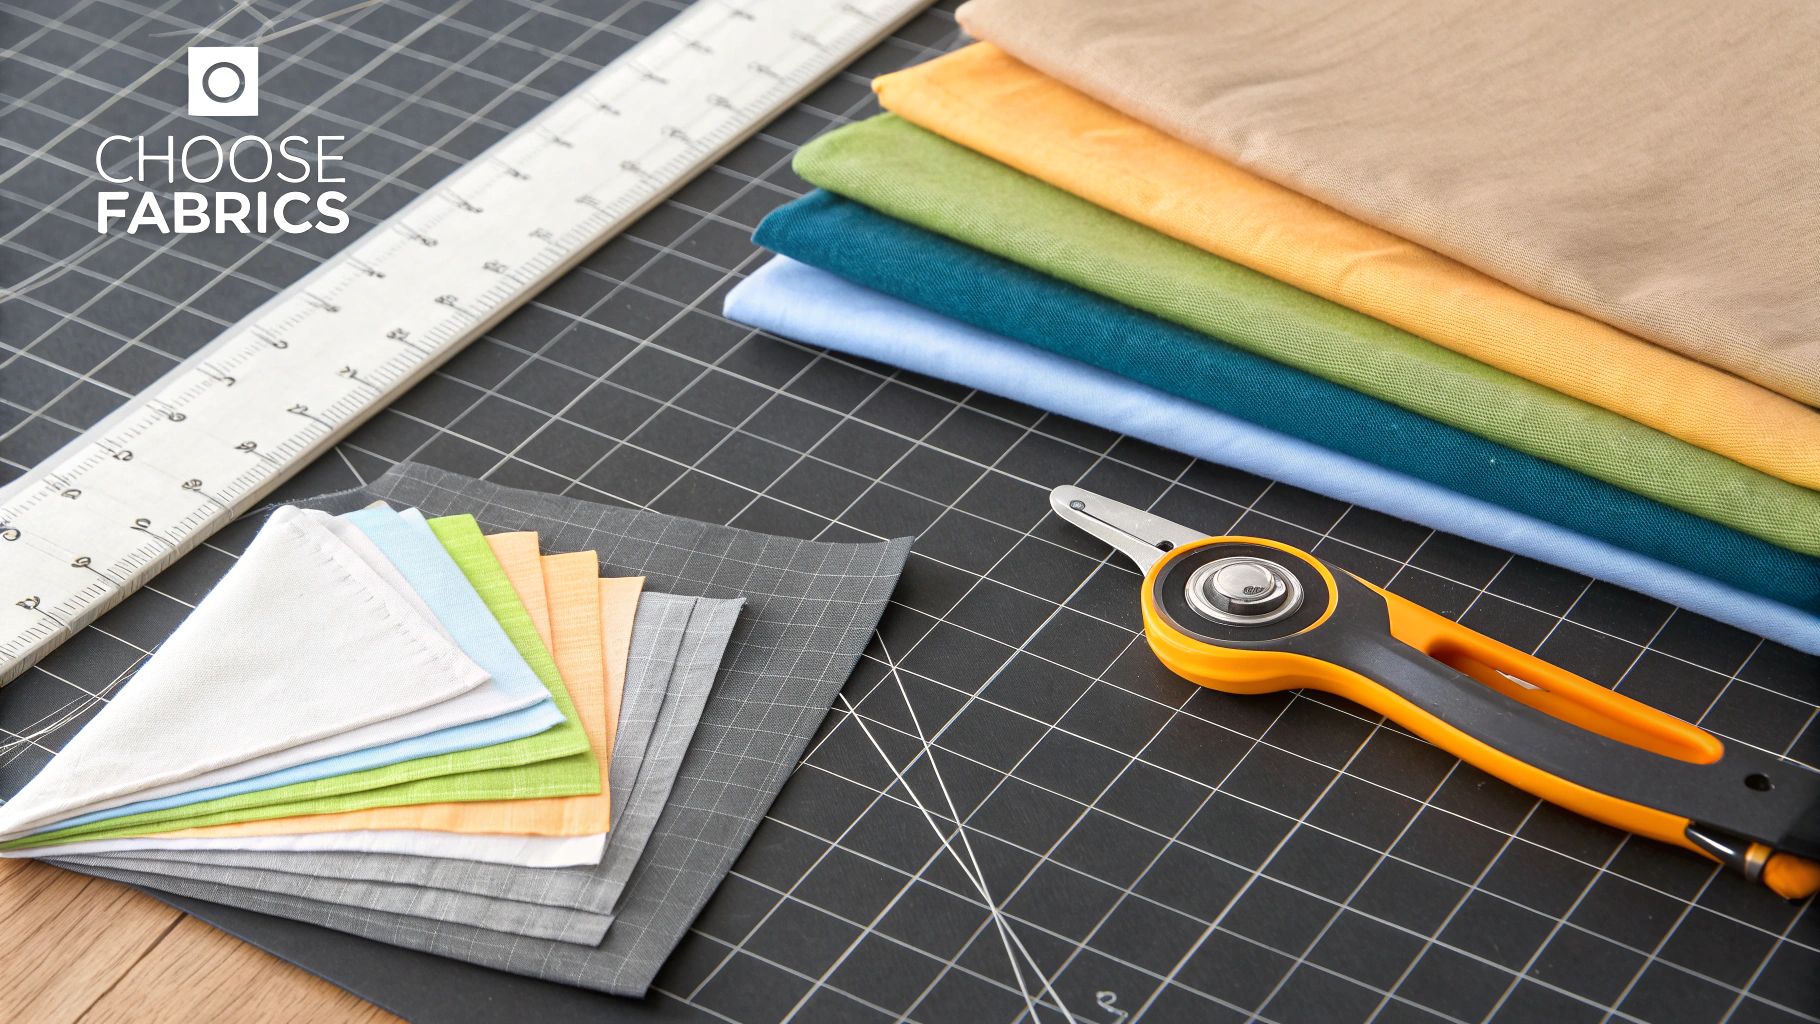
The secret to a fantastic homemade picnic blanket really comes down to the materials you choose. I like to think of it like building the perfect sandwich—every layer has a job to do, and when they all work together, the result is something special. We're going to build this blanket from the inside out, making sure it’s comfy, tough, and just right for all your adventures.
Your choices here will completely change how the blanket feels, how it handles damp grass, and frankly, how much fun it is to sew. So, let's get into the best options for each layer.
Selecting Your Top Layer Fabric
This is the fun part! The top layer is what you’ll see and feel, so it’s your chance to pick a print or colour that you absolutely love.
For most people, especially if you're just starting out, classic quilting cotton is a brilliant choice. The variety of designs is endless, it’s a dream to work with, and it feels lovely and soft.
If you know your blanket is going to see some heavy action, you might want to consider something a bit more rugged like cotton canvas or duck cloth. These fabrics are incredibly durable and can take a beating, which is perfect for rocky ground or frequent family outings. They are a bit stiffer to sew, but the trade-off is a blanket that will last for years.
Understanding Batting for Comfort
The middle layer, or batting, is what turns a simple cloth into a plush, comfortable blanket. Without it, you’re basically just sitting on the hard ground. The trick is to find the sweet spot between comfort and portability.
My go-to is usually a low-loft cotton or cotton-blend batting. It provides just enough cushion to take the edge off the ground without making the blanket a beast to roll up and carry.
Here's a tip from experience: try to avoid high-loft polyester batting for this project. While it feels incredibly fluffy on the bolt, it can be a slippery nightmare to quilt and makes the finished blanket almost impossible to fold or roll up tightly.
Another great option is fusible fleece, which you can iron directly onto the back of your top fabric. This is a game-changer for preventing the layers from shifting around and can make the quilting process much less stressful.
Choosing a Waterproof Backing
Now for the unsung hero of any great picnic blanket: the backing. A waterproof layer is what protects you from damp ground, morning dew, or that inevitable juice box spill. Trust me, this is one area where you don't want to skimp.
When it comes to picking a waterproof material, there's a huge range of options to suit your needs and budget. Below is a handy guide to help you compare some of the most popular combinations for building your perfect picnic blanket.
Picnic Blanket Fabric Combination Guide
| Use Case | Top Layer Fabric | Middle Layer (Optional) | Backing Fabric | Key Benefits |
|---|---|---|---|---|
| Everyday Family Fun | Quilting Cotton | Low-Loft Cotton Batting | PUL Fabric | Soft, comfortable, and fully waterproof. A classic, reliable choice. |
| Light & Packable | Lightweight Cotton | Fusible Fleece | Coated Ripstop Nylon | Easy to carry, water-resistant, and great for hiking or beach trips. |
| Rugged & Heavy-Duty | Cotton Canvas/Duck | No Batting (or thin flannel) | Heavy-Duty Vinyl | Extremely durable, easy to wipe clean, and ideal for rough terrain. |
| Super Cozy & Warm | Flannel or Minky | High-Loft Cotton Batting | Fleece (water-resistant) | Incredibly soft and warm, perfect for cooler autumn days. |
Each combination offers a different feel and function, so think about where and how you’ll use your blanket most often.
Here's a closer look at two of my favourite waterproof backing fabrics:
- PUL (Polyurethane Laminate): This fabric is soft, flexible, and completely waterproof—it’s the same stuff used for modern cloth diaper covers, so you know it’s reliable. When sewing with PUL, use clips instead of pins to avoid making holes, and pop on a walking foot to stop it from sticking. For a deeper dive, check out our guide on working with waterproof fabrics, which has a lot of similar tips.
- Coated Ripstop Nylon: This material is lightweight, tough, and highly water-resistant. It gives the blanket a more technical, outdoor-gear feel, a bit like a tent or a backpack. It can be a little slippery to work with, but it’s fantastic if you want a blanket that's light and easy to pack away.
Canadians' love for the outdoors is driving some serious growth in the picnic blanket market. In fact, market projections show that sales are expected to climb significantly by 2032, fuelled by family picnics and camping trips.
Essential Tools for a Smooth Project
Having the right tools on hand will make this project a true pleasure instead of a chore. You don't need a professional studio, but a few key items will make all the difference in getting a clean, polished result.
A rotary cutter, self-healing mat, and a quilting ruler are a must-have trio for this project. They make cutting large, straight pieces of fabric so much faster and more accurate than trying to do it with scissors.
If there's one tool I'd call non-negotiable, it's a walking foot for your sewing machine. This special foot grips and pulls all three layers of your blanket "sandwich" through the machine at the same speed, which is the secret to avoiding puckers and shifting. For this project, it's absolutely essential.
Now that you have all your materials gathered, we can get to the fun part: cutting the fabric and bringing your picnic blanket to life. How you cut your pieces sets the foundation for the entire project. A little patience here goes a long way and is the real secret to getting that polished, professional look.
To make things easy, we’ve created a downloadable picnic blanket pattern for you. It has all the templates and exact measurements you’ll need for three different sizes.
- Compact Throw: Just right for two people or for stashing in your bag for a solo park lunch.
- Classic Family Size: This is my go-to size. It’s a fantastic all-rounder for small families and weekend outings.
- Extra-Large Group Blanket: Perfect for big family get-togethers, beach days with friends, or anytime you just want room to really spread out.
Before you touch your fabric, let's get the pattern itself sorted.
Printing and Assembling Your Pattern
When you’re working with a digital pattern, the most critical first step is making sure it prints to the right scale. To do this, always open the PDF file in a program like Adobe Reader, not your internet browser, which can sometimes resize things automatically.
In the print dialogue box, look for the setting that says 100% scale or “Actual Size.” Our pattern has a 1-inch test square on the very first page for this exact reason. Print just that page first and measure the square with a ruler. If it isn't exactly one inch, your blanket will end up a different size than you planned.
Once you’ve confirmed the scale is correct, print the remaining pages. Then, simply trim off the page margins and tape the sheets together, following the guide marks. It's like a simple puzzle and gives you a sturdy template to work with.
A quick tip from my own sewing room: always press your fabric before you start cutting. Wrinkles and creases can throw off your measurements and lead to inaccurate cuts. A few minutes with the iron now will save you a world of frustration and puckered seams later on.
Mastering the Cutting Process
Alright, let's get cutting. Precision is key, but with the right tools, it’s much easier than it sounds. For a project this big, a rotary cutter and a large self-healing mat are absolute game-changers.
Lay your main fabric out on your cutting surface, smoothing out any bumps. If you chose a fabric with a directional print—like stripes or a character motif—take a moment to think about placement. You want to make sure everything is facing the right way up!
Line your quilting ruler up with the edge of your pattern piece, press down firmly on your rotary cutter, and glide it along the ruler in one smooth, confident motion.
Do the same for your batting and backing layers. Take your time with each one. The goal is to have all three layers of your blanket "sandwich" cut to the exact same size.
Tips for Tricky Fabrics
Not all fabrics cut the same. If you’re working with something a bit slippery or extra thick, these little tricks will make the process a whole lot smoother.
- For Waterproof Backings (like PUL or Nylon): These materials love to shift and slide. Use pattern weights to hold everything down while you cut—in a pinch, a few clean soup cans work great! Try to avoid using pins, as they’ll leave permanent little holes in that waterproof layer.
- For Thick Batting: A fresh, sharp blade in your rotary cutter is an absolute must. A dull blade will just drag and stretch the batting, leaving you with a wobbly, uneven edge. You’ll also likely need to apply a bit more pressure than you would with cotton.
Here’s a quick reference chart with the cutting dimensions from our pattern. I always recommend double-checking your own assembled pattern piece against the fabric before making that first cut—measure twice, cut once!
| Blanket Size | Top Fabric Cut | Batting Cut | Backing Fabric Cut |
|---|---|---|---|
| Compact Throw | 1 piece at 50" x 50" | 1 piece at 50" x 50" | 1 piece at 50" x 50" |
| Family Size | 1 piece at 60" x 72" | 1 piece at 60" x 72" | 1 piece at 60" x 72" |
| Extra-Large | 1 piece at 72" x 84" | 1 piece at 72" x 84" | 1 piece at 72" x 84" |
With your pieces all cut and ready to go, it's time to head to the sewing machine
Sewing Your Picnic Blanket Together
Alright, with all your fabric pieces cut and ready to go, we're at the fun part—bringing it all together at the sewing machine! This is where those three separate layers become one cozy, durable blanket. We'll walk through the assembly step-by-step, focusing on the little tricks that make a huge difference in getting a professional-looking finish.
The very first, and maybe most important, step is creating what's often called a "quilt sandwich." It’s all about layering your fabrics correctly and making sure they stay put so nothing shifts or bunches up while you sew. Trust me, a little patience here will save you a world of headaches later on.
Assembling Your Blanket Sandwich
Think of this part like making a bed—you want every layer perfectly smooth before moving on. You’ll need a large, clean patch of floor for this, so clear some space in the living room or dining room.
First, lay your backing fabric down with the wrong side facing up. If you’re using a waterproof material like PUL, this means the shiny, coated side should be looking at you. Smooth it out completely. It can help to use painter’s tape on the corners to keep it taut and secure to the floor.
Next up is the batting. Place it right on top of the backing, smoothing it out from the centre towards the edges to get rid of any wrinkles.
Finally, lay your top fabric over the batting, this time with the right side facing up. Your pretty patterned fabric should be looking right at you. Give it a final smooth-down to make sure all three layers are perfectly stacked and aligned.
Basting Your Layers Securely
"Basting" is just the sewing term for temporarily holding your layers together. It’s the secret weapon against puckers on your final blanket. You’ve got a couple of great options here.
- Pin Basting: This is the classic method. Using curved safety pins (they’re so much easier to work with than regular ones!), place a pin every 4-6 inches all over the blanket. Always start from the centre and work your way out to the edges.
- Spray Basting: If you want a faster alternative, a temporary fabric adhesive spray is fantastic. You’ll spray it lightly between each layer, following the instructions on the can. It’s a huge time-saver, but make sure you use it in a well-ventilated space.
A common mistake is just pinning around the edges. This leaves the middle of the blanket free to shift around, which is a surefire way to get annoying puckers and tucks on the back. You really have to baste the entire surface, starting from the middle.
Once your blanket sandwich is basted and secure, you're ready to head to the machine.
This simple visual breaks down the prep work that gets you to this point.
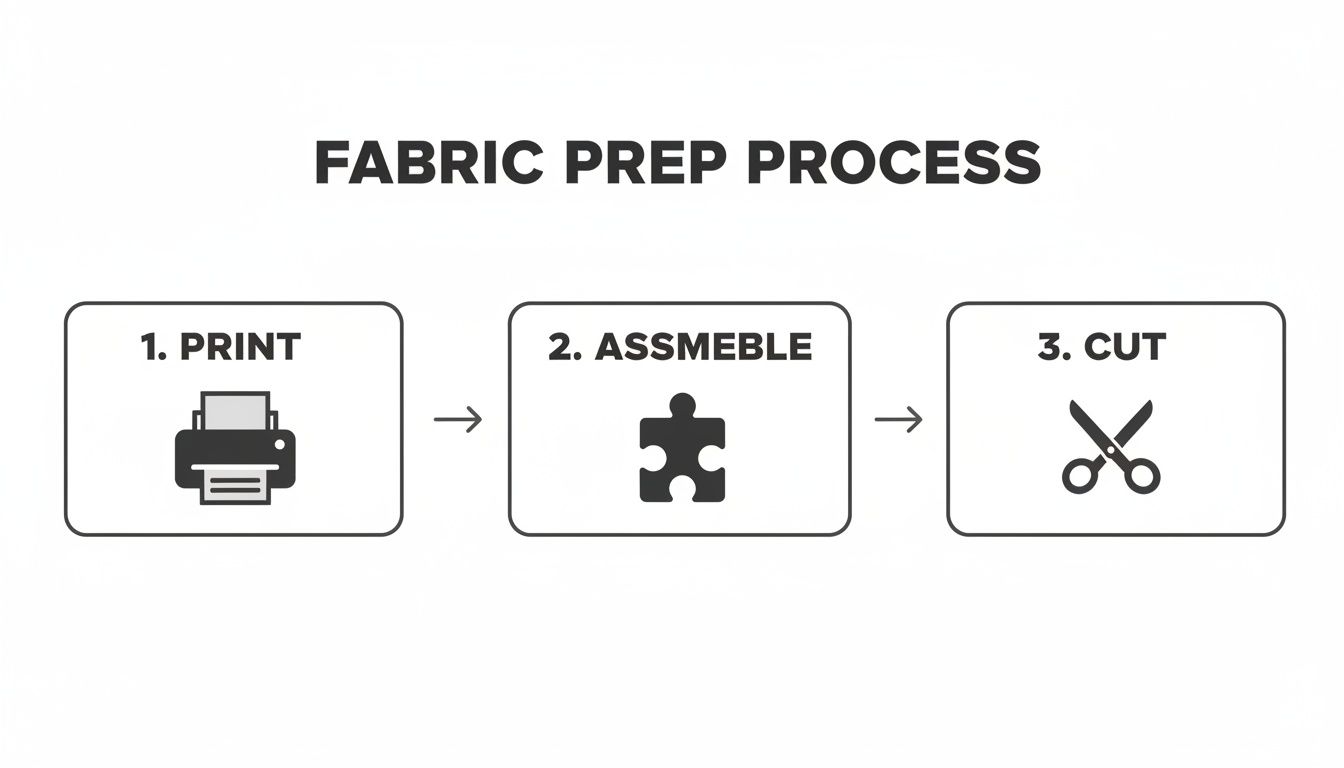
This Print, Assemble, and Cut workflow is all about making sure your pieces are accurate before you even start sewing. It really sets you up for success.
Quilting Your Picnic Blanket
Quilting is simply the stitching that goes through all three layers, locking them together for good and adding that lovely textured look. For this project, we’re going to stick to two easy but beautiful methods that are perfect for beginners.
But before you sew a single stitch, install a walking foot on your sewing machine. Honestly, this is non-negotiable for a project with this many layers. A walking foot has its own set of feed dogs on top, which work in sync with the machine's feed dogs to pull all layers through evenly. It’s the key to a smooth, pucker-free finish.
Method One: Simple Straight Lines
This method gives a clean, modern look and is incredibly straightforward. The idea is to sew straight lines, either horizontally or vertically, across the entire blanket.
I recommend lengthening your stitch to about a 3.0 mm or 3.5 mm. A longer stitch looks much better on thick layers and prevents the thread from getting buried in the fabric.
To keep your lines perfectly straight, you can use a quilting guide bar that attaches to your walking foot, or just use the edge of the foot itself as a guide. Start with your first line right down the centre of the blanket. For the next line, just align your guide with your first row of stitching and sew a parallel line. Keep repeating this, working from the centre outwards, until the whole blanket is quilted. A spacing of 2 to 4 inches between lines looks fantastic.
Method Two: Classic Crosshatch
A crosshatch pattern is just as easy as straight lines but gives you that timeless, traditional grid look. It’s my personal favourite for a classic picnic blanket.
You'll start exactly the same way as the first method, by quilting straight lines all in one direction. After you've stitched all your vertical (or horizontal) lines, you just turn the blanket 90 degrees and do it all over again, sewing lines that cross over your first set.
The result is a beautiful and really sturdy grid that secures every part of the blanket. This adds a ton of stability, which is perfect for a blanket that's going to be used and washed a lot. Just remember to backstitch at the beginning and end of each quilting line to lock your stitches. The thread you pick can also play a role; you can learn all about choosing the right thread types for sewing projects in our other guide.
Troubleshooting Common Issues
Even with careful prep, you might hit a snag. Don't worry! Here’s how to deal with the most common problem when quilting thick projects.
If you notice your machine is struggling or skipping stitches, the first thing to check is your needle. You're asking a lot of it—punching through three layers, including thick batting. Swap out your standard universal needle for a fresh Denim or Quilting needle in a size 90/14 or 100/16. These needles are stronger and sharper, designed specifically for getting through tough, thick fabrics.
Once your quilting is all done, the final step before binding is to trim the excess batting and backing fabric, making sure all your edges are nice and square.
Adding Professional Finishing Touches
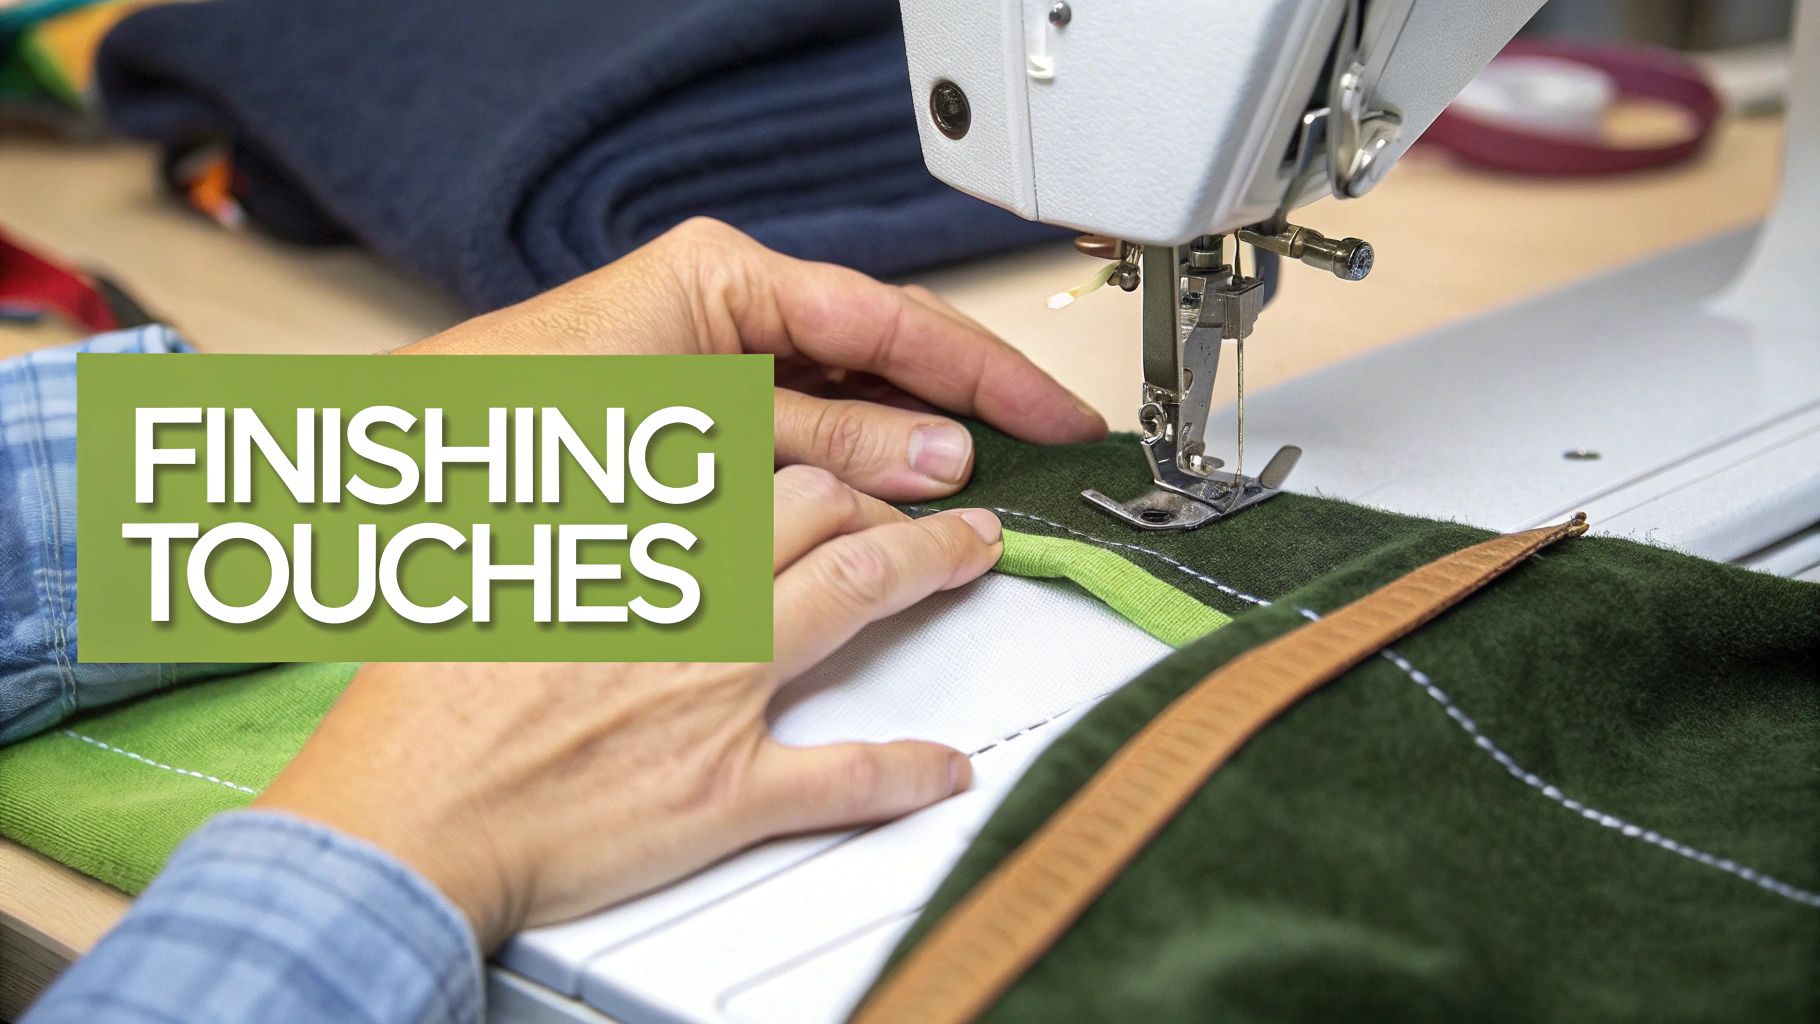
You’ve done the quilting, and your project is finally looking like a real blanket! Now it’s time for those final details that take your project from homemade to handmade-with-love. These finishing touches don't just look great; they add a ton of durability and convenience for all your future picnics.
The most crucial step is adding the binding. This is the fabric border that wraps around the raw edges, protecting them from fraying and giving your blanket a clean, polished frame. You can definitely buy pre-made bias tape, but making your own from a coordinating fabric is a fantastic skill to learn. It gives your project a much more custom, high-quality feel. For a complete walkthrough, check out our in-depth guide on binding a quilt tutorial—it covers everything from cutting the strips to getting those perfectly mitered corners.
Creating a Roll-Up Strap and Handle
A built-in strap is an absolute game-changer for a picnic blanket. It keeps it rolled up tight and makes it so much easier to carry and store. No more trying to stuff it into a separate bag! A simple, functional strap is a must-have.
To make one, you’ll need a long strap to wrap around the blanket and a shorter handle.
- Cut the fabric: Using a sturdy fabric like canvas or even some leftover backing material, cut one piece 4" x 28" for the main strap and a second piece 4" x 12" for the handle.
- Sew the tubes: Fold each piece in half lengthwise with the right sides of the fabric facing each other. Sew along the long edge with a 1/4" seam allowance, which will create two long fabric tubes.
- Turn and press: Turn both tubes right-side out. A safety pin or a tube turner makes this part much less fussy! Press them flat, making sure the seam is in the centre of the back, then topstitch along both long edges for a crisp, professional finish.
- Attach to the blanket: Fold the long strap in half to find its centre. Pin that centre point right in the middle of one of the shorter edges of your blanket backing. Stitch it down securely before you attach your binding—this way, the strap gets neatly caught in the binding seam for extra strength.
To close the strap, you can sew a bit of Velcro onto the ends or add a simple snap. The shorter handle piece gets folded into a loop and sewn securely onto the middle of the long strap, giving you a comfortable grip.
Adding a Pocket for Small Essentials
Here’s another fantastic customization: a small corner pocket. It’s the perfect place to stash your keys, phone, or sunscreen, keeping them off the damp grass and right where you can find them.
A corner pocket is an incredibly simple addition with a big impact. I like to add mine to the waterproof backing side so it’s more protected and discreet when the blanket is laid out.
Making a pocket is easy. Just cut a square of fabric—an 8" x 8" square is a great starting size. Hem the top edge, then press the other three raw edges under by about 1/4". Position the pocket on a corner of your blanket and simply topstitch it into place along those three folded sides. I always backstitch at the corners to reinforce them. You can even add a snap for extra security. These thoughtful little additions are what truly make your picnic blanket your own.
Still Have Questions About Making Your Picnic Blanket?
As you get ready to start sewing, you’re bound to have a few questions. That’s completely normal—every sewer has been there! I’ve put together some of the most common queries I get, with practical answers to help you feel confident as you create a blanket you’ll be proud of.
Think of this as your go-to troubleshooting guide for everything from swapping fabrics to keeping your blanket looking great for years to come.
Can I Make This Blanket Without a Waterproof Layer?
Absolutely! A waterproof backing is a great feature, but it’s not always necessary. It really just depends on how and where you plan to use your blanket.
If you’re picturing picnics on a dry, sunny deck, a sandy beach, or even using it indoors as a play mat for the kids, you can definitely skip the waterproof material. In fact, a non-waterproof blanket is often a little quicker to sew and can have a much softer, cozier feel.
Here are a couple of my favourite alternatives for the backing:
- Sturdy Cotton Canvas: This gives the blanket a nice weight and makes it really durable, without the slick feel of a waterproof layer.
- Soft Fleece or Minky: Using a plush fabric for the back turns your project into an incredibly cozy throw. It’s perfect for those cooler autumn days or for an evening of stargazing.
Just treat your chosen fabric as the backing layer and follow the same construction steps. This is a great way to adapt the project if it’s your first time trying out a new picnic blanket pattern.
How Should I Wash and Care for My Handmade Blanket?
The best way to care for your blanket comes down to the fabrics you chose. Always think back to your materials when it’s time for a wash.
For blankets made entirely from natural fibres like cotton or canvas, care is pretty simple. You can usually machine wash them on a gentle cycle with cold water. Tumble dry on low heat, or even better, hang it on the line to air dry.
However, if you used a special waterproof backing like PUL, you need to be a bit more careful. High heat is the enemy of waterproof coatings and can cause them to break down or lose their effectiveness. For these blankets, air drying is always the safest bet.
A little tip for stubborn stains from things like grass or spilled drinks: spot-treat them as soon as you get home. A bit of stain remover and a gentle scrub before it goes into the wash can make all the difference in keeping your blanket looking fresh.
What Is the Easiest Version for a Total Beginner?
If you're brand new to sewing and the thought of quilting through three layers feels a bit much, don’t worry. There's a much simpler method that’s quick, easy, and gives a fantastic result. It's often called a "turn-through" or "pillowcase" blanket.
This simplified approach skips the batting and quilting completely. Here’s all you have to do:
- Cut your top fabric (quilting cotton is great) and your backing fabric (fleece works perfectly here) to the same size.
- Place them with their right sides together.
- Sew all the way around with a 1/2-inch seam allowance, but make sure to leave a 6 to 8-inch gap open on one of the sides for turning.
- Clip the corners to get rid of extra bulk, then turn the whole blanket right-side out through the opening.
- Gently poke out the corners with a turning tool or even the blunt end of a knitting needle to make them nice and sharp.
- Press the blanket flat, tucking in the raw edges of the opening so they’re neat.
- Finally, topstitch all the way around the blanket, about 1/4-inch from the edge. This closes up the gap and gives you a beautiful, crisp finish.
Can I Repurpose an Old Quilt Top for This Project?
Yes, and what a fantastic and sustainable idea that is! Using an unfinished or vintage quilt top is a wonderful way to give a sentimental piece a new life. You’ll end up with a truly one-of-a-kind picnic blanket filled with history and character.
You’ll want to pair it with a durable backing—and a waterproof one if you like—to protect the delicate patchwork from the ground. Just layer it with batting like you would with new fabric, baste it well, and add some simple quilting.
A great way to do this is by "stitching in the ditch," which just means you sew right along the existing seam lines of the quilt blocks. This secures all the layers without taking away from the original design. It’s a beautiful way to honour an old project and turn it into something new and incredibly useful.
Ready to start your next project with the best tools and fabrics? All About Sewing has everything you need, from beginner-friendly machines to expert advice.


